Author Archives: weblizar

Service Showcase
Service Showcase plugin is managing the service card/box. It comes with different layouts that can be used to create and display multiple showcases of your services on your website. Easy to use and generate unlimited shortcode with multiple posts.
### Service Showcase Features You Will Get ###
Simplified Service Showcase – Service Showcase is simplified with separate posts with separate short codes.
Unlimited Service – Publish any number of service posts.
Service Layout – 6 types of service column layouts.
Font Family– You change the font family as per requirements.
Individual settings option – Design every service-box with there designs.
Unlimted shortcode – Create unlimited service box with shortcodes

Ultimate timeline – Responsive Timeline block
Ultimate Timeline plugin creates beautiful history time-lines on your website. It is a responsive timeline showcase in DESC order based on posted date of stories with colors, font awesome icons.
A quick and easy to use timeline plugin to build creative and responsive timelines for your website. Display the beautiful time-line grid and list of WordPress posts, pages in minutes. No coding required. Mobile friendly. Optimized for performance.
ULTIMATE TIMELINE – WORDPRESS #1 TIMELINE PLUGIN
Ultimate Timeline is a responsive WordPress pure HTML & CSS timeline plugin that allows you to create a beautiful horizontal and vertical history timeline. You simply create posts, set images and date then Ultimate Timeline will automatically populate these posts in chronological order(DESC), based on the posted date of stories. You can easily show the timeline on any page of your website using shortcode – [weblizar_timeline]
ULTIMATE TIMELINE SHORTCODE
[weblizar_timeline layout=”default” date-format=”Y M d” icons=”YES” show-posts=”YES” order=”DESC” story-content=”full”]
FEATURES OF ULTIMATE TIMELINE
- Vertical Timeline:- Now our free users can also create a Vertical timeline, which means a timeline without a lot of space between stories.
- Default Layout:- If you love the clean and clear look without a lot of colors then you can showcase your story via our default layout.
- Horizontal Roadmap Timeline:- With the help of Roadmap design, you can represent your Project/Company Plans and Phases.
- Advanced Design & Optimized Code:- We have also made it developer-friendly, you can easily customize the timeline story default query.
- Create a both-sided vertical timeline.
- Choose cool icons along with stories.
- Show stories in DESC order.
- Easy to use shortcode to place the ultimate timeline wherever your heart desires – [weblizar_timeline].
- Responsive and mobile-ready timeline.
ULTIMATE TIMELINE PRO FEATURES
- You can change the layout into the Vertical/Horizontal way.
- Specify story background custom colors.
- You can specify different colors for story posts title.
- You can specify different Background colors for story posts title.
- You can specify different colors for story posts content.
- You can specify different background colors for story posts content.
- You can specify different Dates format for your stories.
- You can specify different animations to your every story.
WHERE CAN YOU USE ULTIMATE TIMELINE PLUGIN?
You can show history/future stories, events, appointments and many other cool things using our Ultimate Timeline plugin. Here are all areas where you can use this plugin:-
* Represent your company story.
* Showcase tutorial/process steps in a timeline format.
* Create a program timeline.
* Timeline is the best way to represent history.
* Create events/appointments timeline.
* Job stories/achievements timeline.
* Personal story timeline

Betstream WordPress Theme
Bitstream is an elegantly designed theme suitable for various types of business websites. Bitstream comes with several features to make a user-friendly, interactive and visually stunning website. Such features include custom menu, attractive Slider with a Call to Action button, service section,portfolio, and breadcrumbs. The theme is tested and optimized for speed and faster page load time and has a secure and clean code. The theme is also translation ready. For Custom Home Template theme recommends a plugin which will help you to design your desired Home Page.

Happy Independence Day
Feel the pride of being the part of such a glorious nation. Here’s sending my warm patriotic wishes to make this day truly memorable.
Team weblizar wishes you a very Happy Independence Day…

How To Create A Hello World Extension In Magento 2
-
weblizar
1 Comment
- Docs , eCommerce , Magento 2 , Plugins
- how to build magento extension, learn how to make magento extension, magento, magento 2, magento 2 development, magento 2 extension, magento extension, magento extension tutorial, magento extensions, simple magento extension
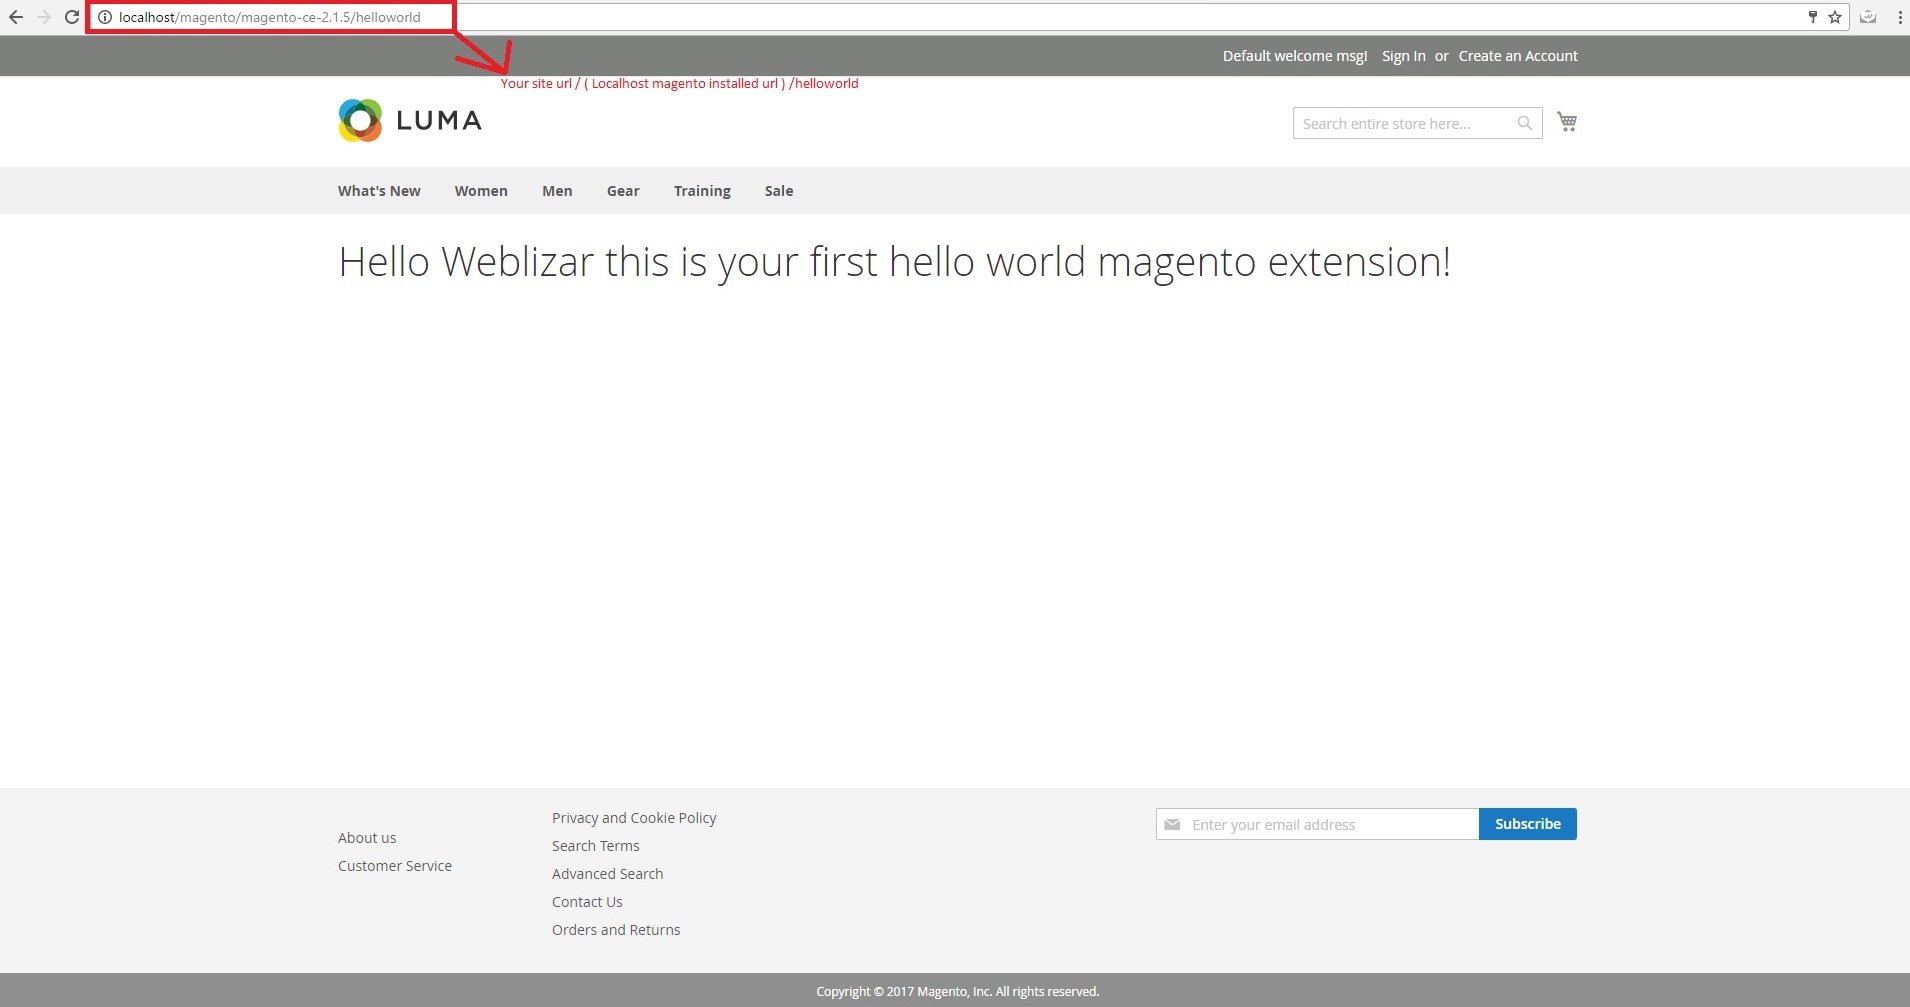
We are going to build a very simple extension in Magento 2. When finished, the extension ‘s output will say ” Hello Weblizar, This is your first hello world Magento Extension! ” in the block content on a custom frontend route. Let us learn how to create an extension in magento 2 with hello world as our output.
Requirement :
At list, you have latest Magento 2 version which is currently 2.1. Is installed on your local system.
Before we start a Magento 2 extension development, there are two things people often forget and we recommend you to do:
1. Disable Magento cache
Disabling Magento cache during development will save you some time because you won’t need to manually flush the cache every time you make changes to your code.
The easiest way to disable cache is to go to Admin => System => Cache Management => select all cache types and disable them.
2. Put Magento into a developer mode
You should put Magento into a developer mode to ensure that you see all the errors Magento is throwing at you.
In order to do this, open your terminal and go to the Magento 2 root. From there you should run the following command:
php bin/magento deploy:mode:set developer
How To Create An Extension In Magento:
Creating the extension files and folders:
Extension Setup
The first step is to create the extension folder and necessary files required to register a Magento extension.
1. Create the following folders:
- app/code/Weblizar
- app/code/Weblizar/Helloworld
The Weblizar folder is the extension namespace, and Helloworld is the extension name.
Note: If you don’t have the code folder in your app directory, create it manually.
2. Now that we have an extension folder, we need to create a module.XML file in the app/code/Weblizar/Helloworld/etc folder with the following code:
<?xml version=”1.0″?>
<config xmlns:xsi=”http://www.w3.org/2001/XMLSchema-instance” xsi:noNamespaceSchemaLocation=”urn:magento:framework:Module/etc/module.xsd”>
<module name=”Weblizar_Helloworld” setup_version=”1.0.0″></module>
</config>
3. To register the module, create a registration.php file in the app/code/Weblizar/Helloworld folder with the following code:
<?php
\Magento\Framework\Component\ComponentRegistrar::register(
\Magento\Framework\Component\ComponentRegistrar::MODULE,
‘Weblizar_Helloworld’,
__DIR__
); ?>
4. Open your terminal and go to the Magento 2 root. Run from there the following command:
php bin/magento setup:upgrade
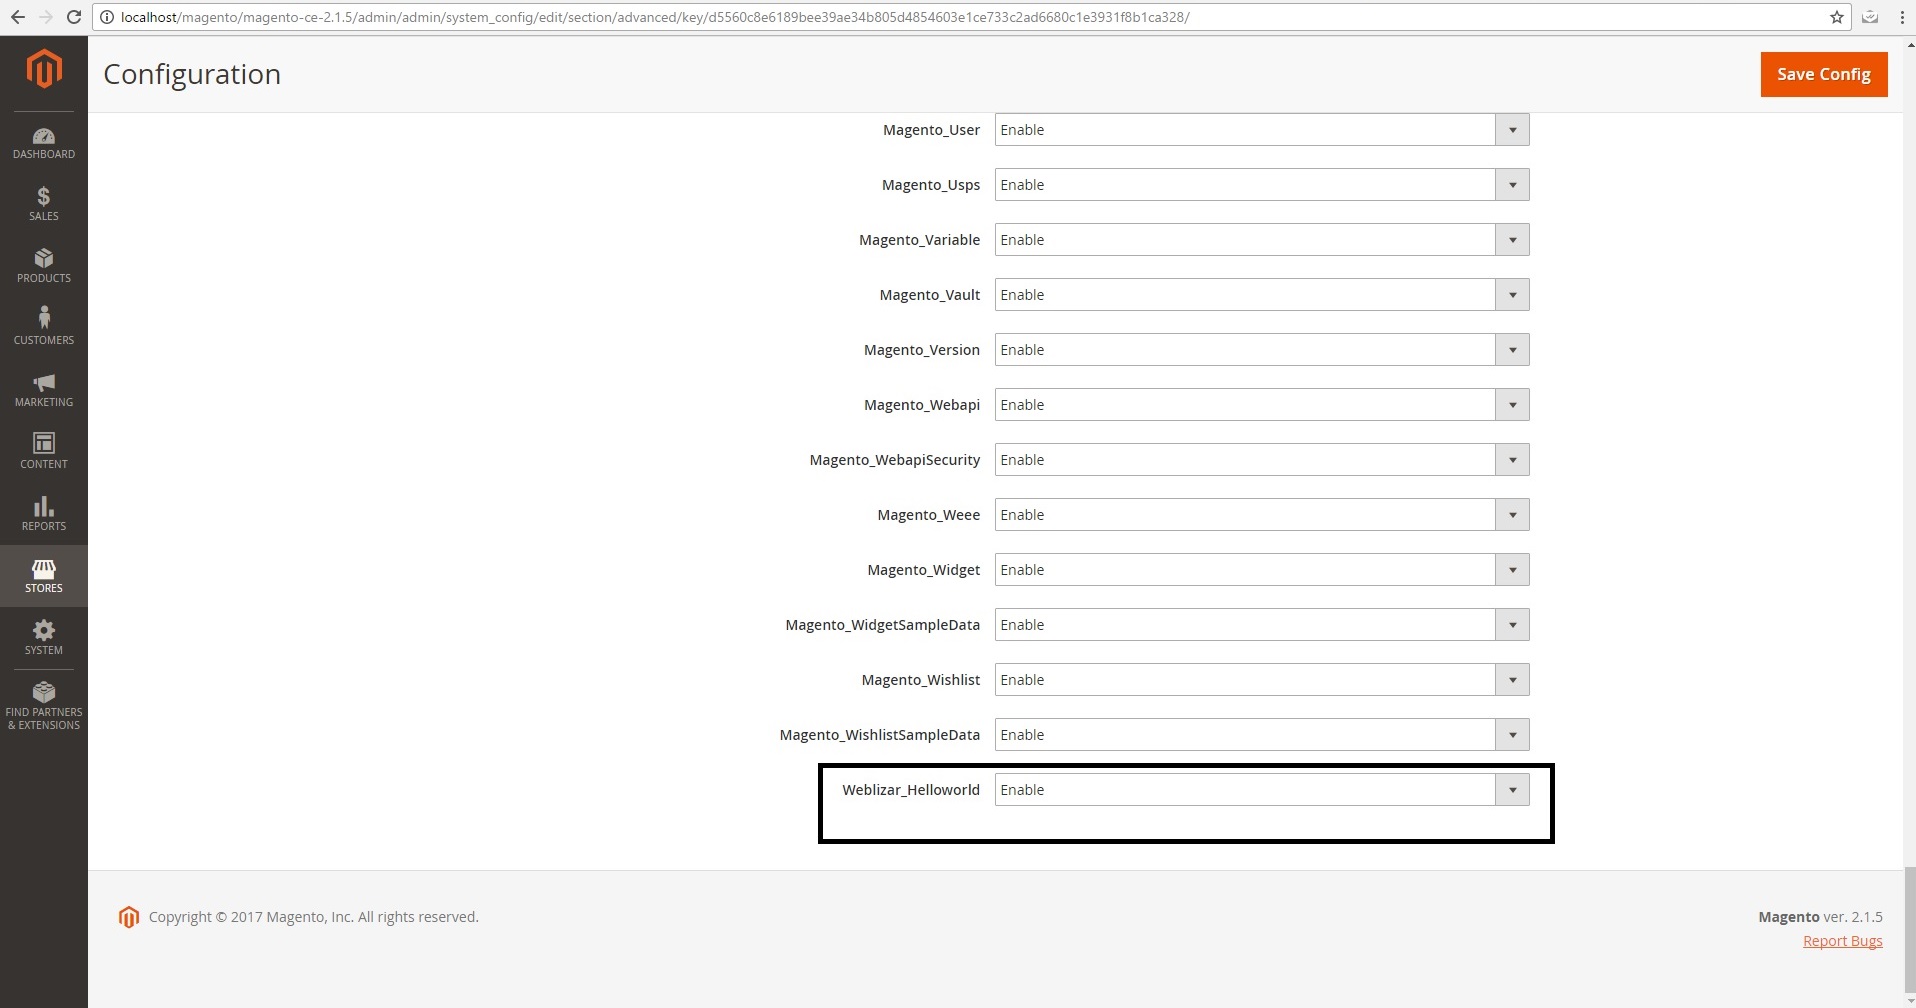
If you want to make sure that the extension is installed, you can go to Admin => Stores => Configuration => Advanced => Advanced and check that the extension is present in the list or you can open app/etc/config.php and check the array for the ‘Weblizar_Helloworld’ key, whose value should be set to 1.
Creating a controller
1. First we need to define the router. To do this, create a routes.XML file in the app/code/Weblizar/Helloworld/etc/frontend folder with the following code:
<?xml version=”1.0″?>
<config xmlns:xsi=”http://www.w3.org/2001/XMLSchema-instance” xsi:noNamespaceSchemaLocation=”urn:magento:framework:App/etc/routes.xsd”>
<router id=”standard”>
<route id=”helloworld” frontName=”helloworld”>
<module name=”Weblizar_Helloworld” />
</route>
</router>
</config>
Here we are defining our frontend router and route with an id ” helloworld “.
The frontName attribute is going to be the first part of our URL.
In Magento 2 URL’s are constructed this way:
<frontName>/<controler_folder_name>/<controller_class_name>
So in our example, the final URL will look like this:
helloworld/index/index
2. Now we create the Index.php controller file in the app/code/Weblizar/Helloworld/Controller/Index folder with the following code:
<?php
namespace Weblizar\Helloworld\Controller\Index;
use Magento\Framework\App\Action\Context;
class Index extends \Magento\Framework\App\Action\Action
{
protected $_resultPageFactory;public function __construct(Context $context, \Magento\Framework\View\Result\PageFactory $resultPageFactory)
{
$this->_resultPageFactory = $resultPageFactory;
parent::__construct($context);
}public function execute()
{
$resultPage = $this->_resultPageFactory->create();
return $resultPage;
}
}
In Magento 2 every action has its own class which implements the execute() method.
Creating a block
We will create a simple block class with the getHelloWorldTxt() method which returns the “Hello world” string.
1. Create a Helloworld.php file in the app/code/Weblizar/Helloworld/Block folder with the following code:
<?php
namespace Weblizar\Helloworld\Block;class Helloworld extends \Magento\Framework\View\Element\Template
{
public function getHelloWorldTxt()
{
return ‘Hello Weblizar, This is your first hello world magento Extension!’;
}
}
Creating a layout and template files
In Magento 2, layout files and templates are placed in the view folder inside your extension. Inside the view folder, we can have three subfolders: adminhtml, base, and frontend.
The adminhtml folder is used for admin, the frontend folder is used for frontend and the base folder is used for both, admin and frontend files.
1. First, we will create a helloworld_index_index.XML file in the app/code/Weblizar/Helloworld/view/frontend/layout folder with the following code:
<page xmlns:xsi=”http://www.w3.org/2001/XMLSchema-instance” xsi:noNamespaceSchemaLocation=”../../../../../../../lib/internal/Magento/Framework/
View/Layout/etc/page_configuration.xsd” layout=”1column”>
<body>
<referenceContainer name=”content”>
<block class=”Weblizar\Helloworld\Block\Helloworld” name=”helloworld” template=”helloworld.phtml” />
</referenceContainer>
</body>
</page>
Every page has a layout hand and for our controller action, the layout handle is helloworld_index_index. You can create a layout configuration file for every layout handle.
In our layout file, we have added a block to the content container and set the template of our block to helloworld.phtml, which we will create in the next step.
2. Create a helloworld.phtml file in the app/code/Weblizar/Helloworld/view/frontend/templates folder with the following code:
<h1><?php echo $this->getHelloWorldTxt(); ?></h1>
$this variable is referencing our block class and we are calling the method getHelloWorldTxt() which is returning the string ‘Hello world!’.
And that’s it. Open the /helloworld/index/index URL in your browser and you should get something like this and

Happy Independence Day
We wish you Happy Independence Day 2016 to all our readers.India is celebrating 70th independence day on August 15th.
The day is observed to celebrate the nation’s freedom from the British rule in 1947, a movement led by personalities like Mahatma Gandhi, Jawaharlal Nehru, Bhagat Singh, Sardar Vallabhai Patel, Lala Lajpat Rai, Chandra Shekhar Azad, Gopal Krishna Gokhale, Sarojini Naidu, Lokmanya Tilak, among many others.
Freedom in the mind,
Faith in the words..
Pride in our souls..
Let’s salute the nation on 69th Independence Day!
Get the DISCOUNT of “10%” on your next premium purchase. Coupon Code : IDSPL10%OFF

Responsive Coming Soon Page Plugin
Today Weblizar released, new plugin Responsive Coming Soon Page .
“Responsive Coming Soon Page” will useful for your new and existing WordPress site. This plugin have coming soon landing page for WordPress site. We provide the number of features in free plugin.
Features Of Plugin
- Responsive Coming Soon Page
- Bootstrap Based Responsive Plugin Settings Panel
- Compatible With Most WordPress Theme
- Image background
- Color background
- Multiple Color Skins Selection
- News Letter Subscriber Forms
- Subscriber Notification
- Export & Import Subscribers List
- Countdown Timer Until Site Launch
- Latest Font Awesome Icon
- Custom CSS Customizer Inbuilt
- Social Media Profile Icons With Links
- Live Preview During Customization
- Multilingual & Translation Ready
- Compatible With All Major Browsers
- SEO Settings
- Google Analytic Tracking Script Setting
- Access Control Settings
- New Drag & Drop Layout Manager
- Copyright & Banding Footer Page Option
- Automatic Launch (upcoming feature)
- Notify All Subscriber On Site Launch (upcoming feature)
- Multilingual – Translate Plugin In Any Language (upcoming feature)
Responsive Coming Soon Page Plugin For WordPress


MerryChristmas and A Very Happy New Year From “Team Weblizar”
Merry Christmas and A very Happy & Prosperous New Year …
We are Offering a BIG 10% Discount on our All WordPress Premium Products.
Coupon Code : MerryChristmas
Thanks

Weblizar Wishes You A Very Happy Diwali
Weblizar wish A Very Happy Diwal to all our valuable customers.
Celebrate this Diwail with Weblizar and get amazing discount on 10th – 15th November 2015.
We are offering a small gift to all our new & existing customers on this prosperous occasion.
coupon code: HappyDiwali
Use this coupon code to get 10% OFF on all Weblizar Premium products.+
Kind Regards
Weblizar Team

