Admin Custom Login Pro
Admin Custom Login Pro
Weblizar DocsAdmin Custom Login Pro Plugin Documentation
Admin Custom Login Pro Plugin makes the WordPress login attractive.
Features of Plugin
- Login With Social Media
- Login Restrictions
- Login Retry Setting
- Custom Error Message
- Login without username and password
- Add Custom Logo on the login form
- Background Color
- Background Image
- Background Image Slide Show
- Login Form Position
- Login Form Color
- Login Form Font Color
- Login Form Color Opacity
- Login Form Font Style
- Login Form Background
- Customize Login Form Button
- Add Social Media Icon On Login Form
Key Contents
- Plugin Installation
- Brief Description
- Plugin Dashboard
- Background Design
- Login Form Setting
- Login Retry Setting
- Font Setting
- Login With Token
- Login Restrictions
- Social Settings
- Social Login
- Google Captcha
- Export/Import
- Help and Support
1. Plugin Installation
Step 1: First download the plugin from your Weblizar Account.
Step 2: Upload, Install & Activate plugin into a WordPress site.
Step 3: Go to Admin Custom Login plugin menu, and then click on the Dashboard tab on the menu. Select “Enable Custom Login” option and save changes.
2. Brief Description
Admin Custom Login Pro Plugin gives the ability to customize your WordPress admin login page according to your style like it allows changing Logo, background images, form styles, form position and many more features from which you can make an attractive login page.
The Plugin lets your visitors Register and login with social media sites and control.
3. Plugin Dashboard
Go to the plugin menu, and then click on Dashboard tab on the menu. Select “Enable Custom Login” option and save changes. After it, the custom login screen will work on WP login.

4. Background Design
Click to background menu option for Change login form background settings.
Option available for background setting:
- Settings for Background color
- Settings for Background Image
- Settings for Background Slide Show
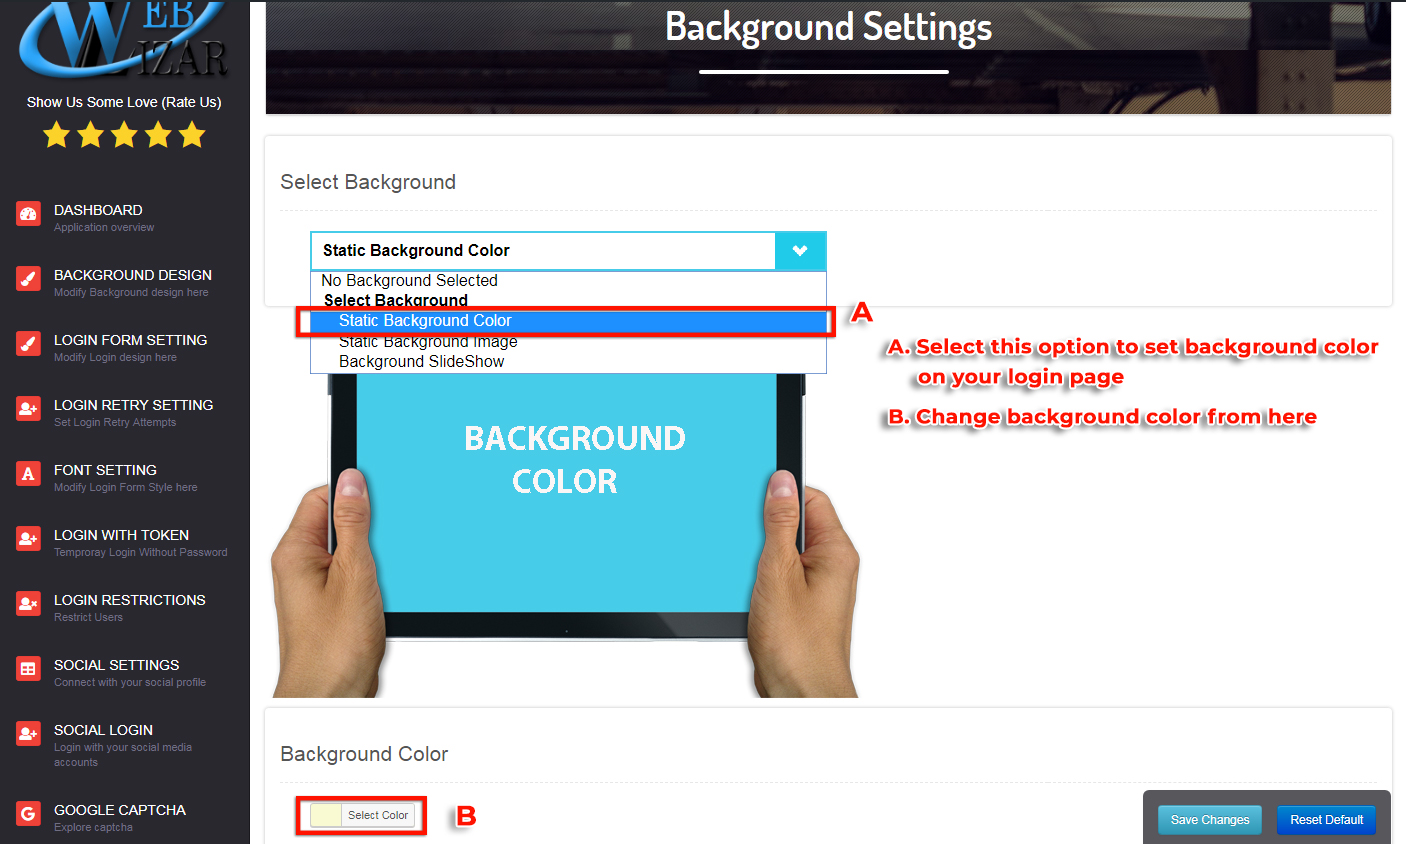
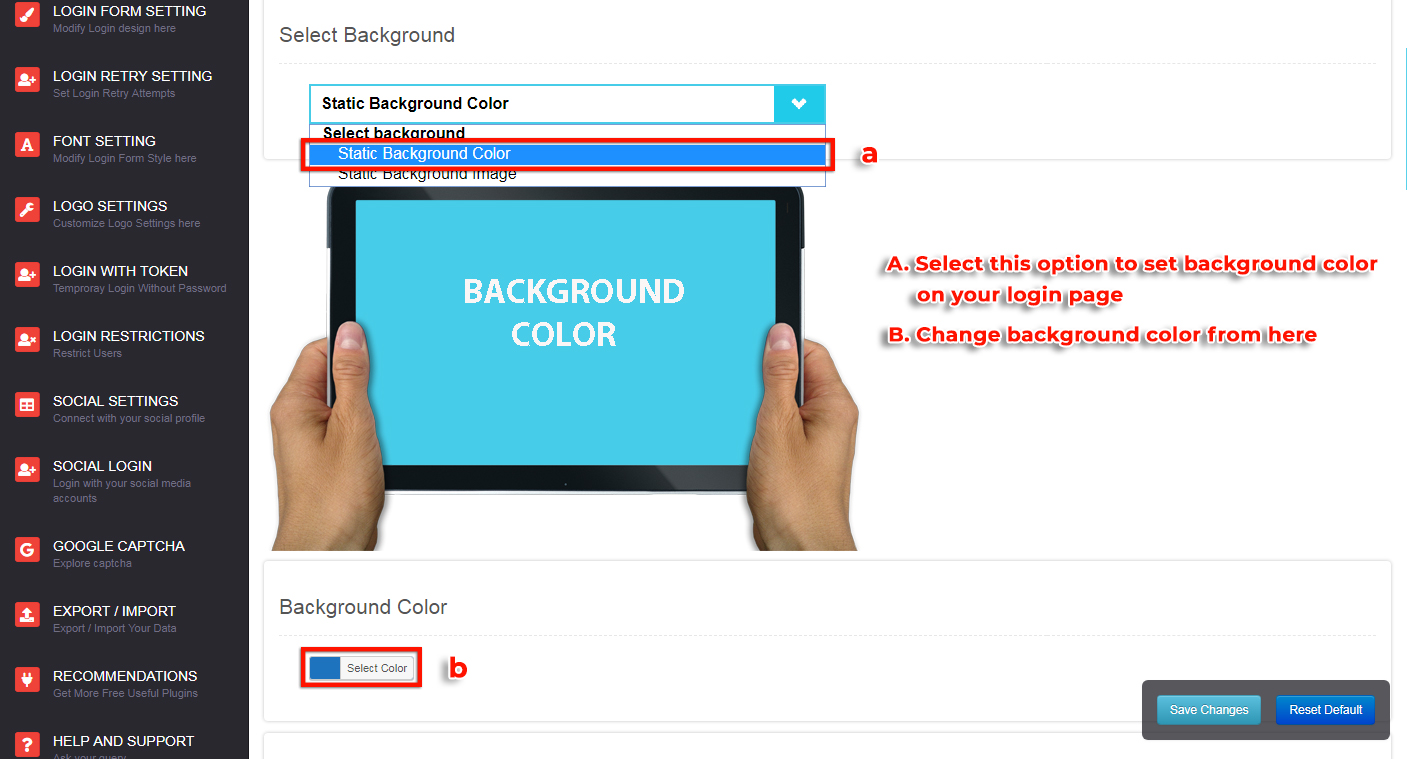
a)Background Color Select ‘Static Background Color’ from the Select option, choose the background color of your login form and click on ‘save change’ button to apply changes.
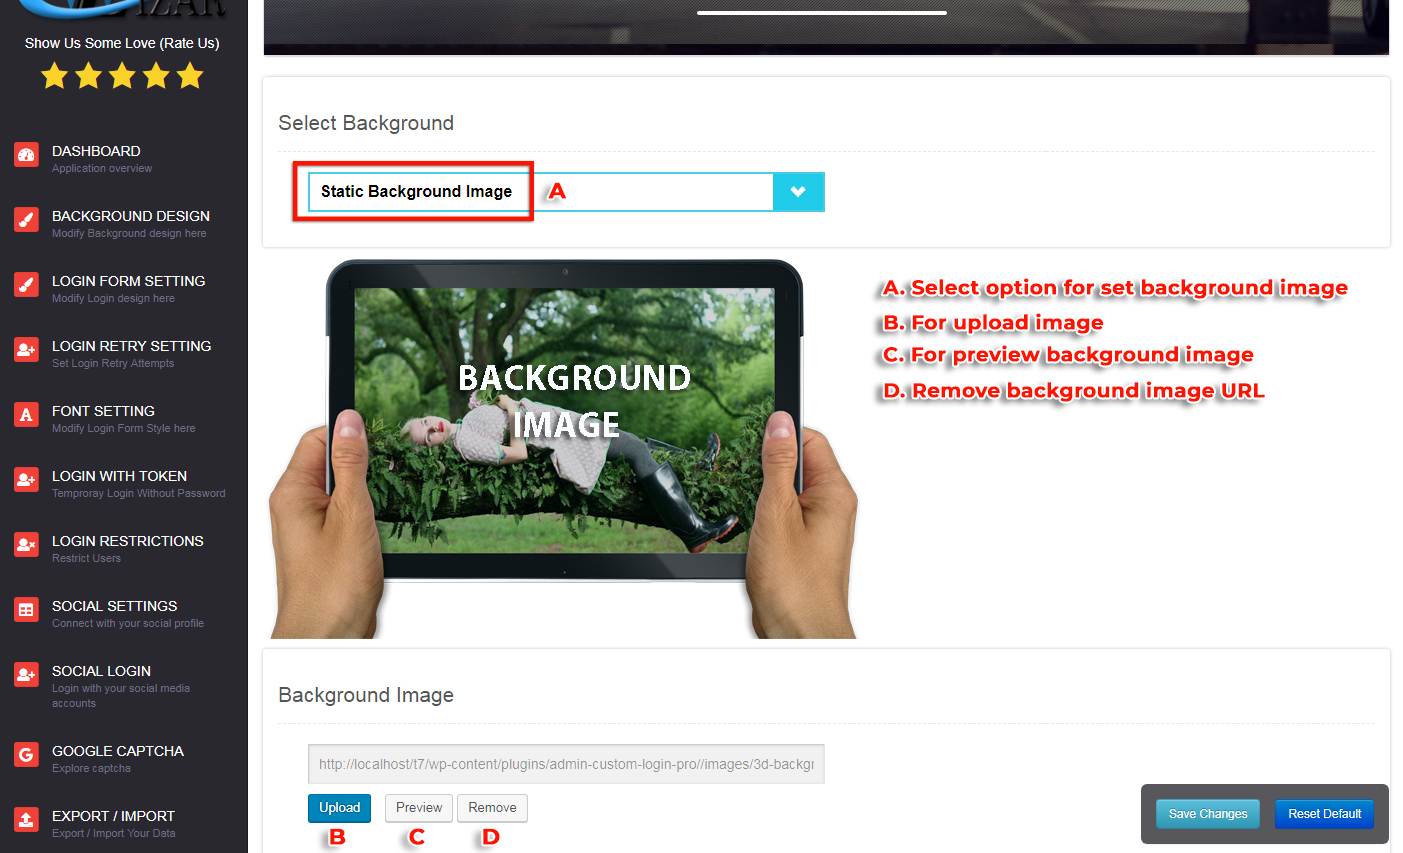
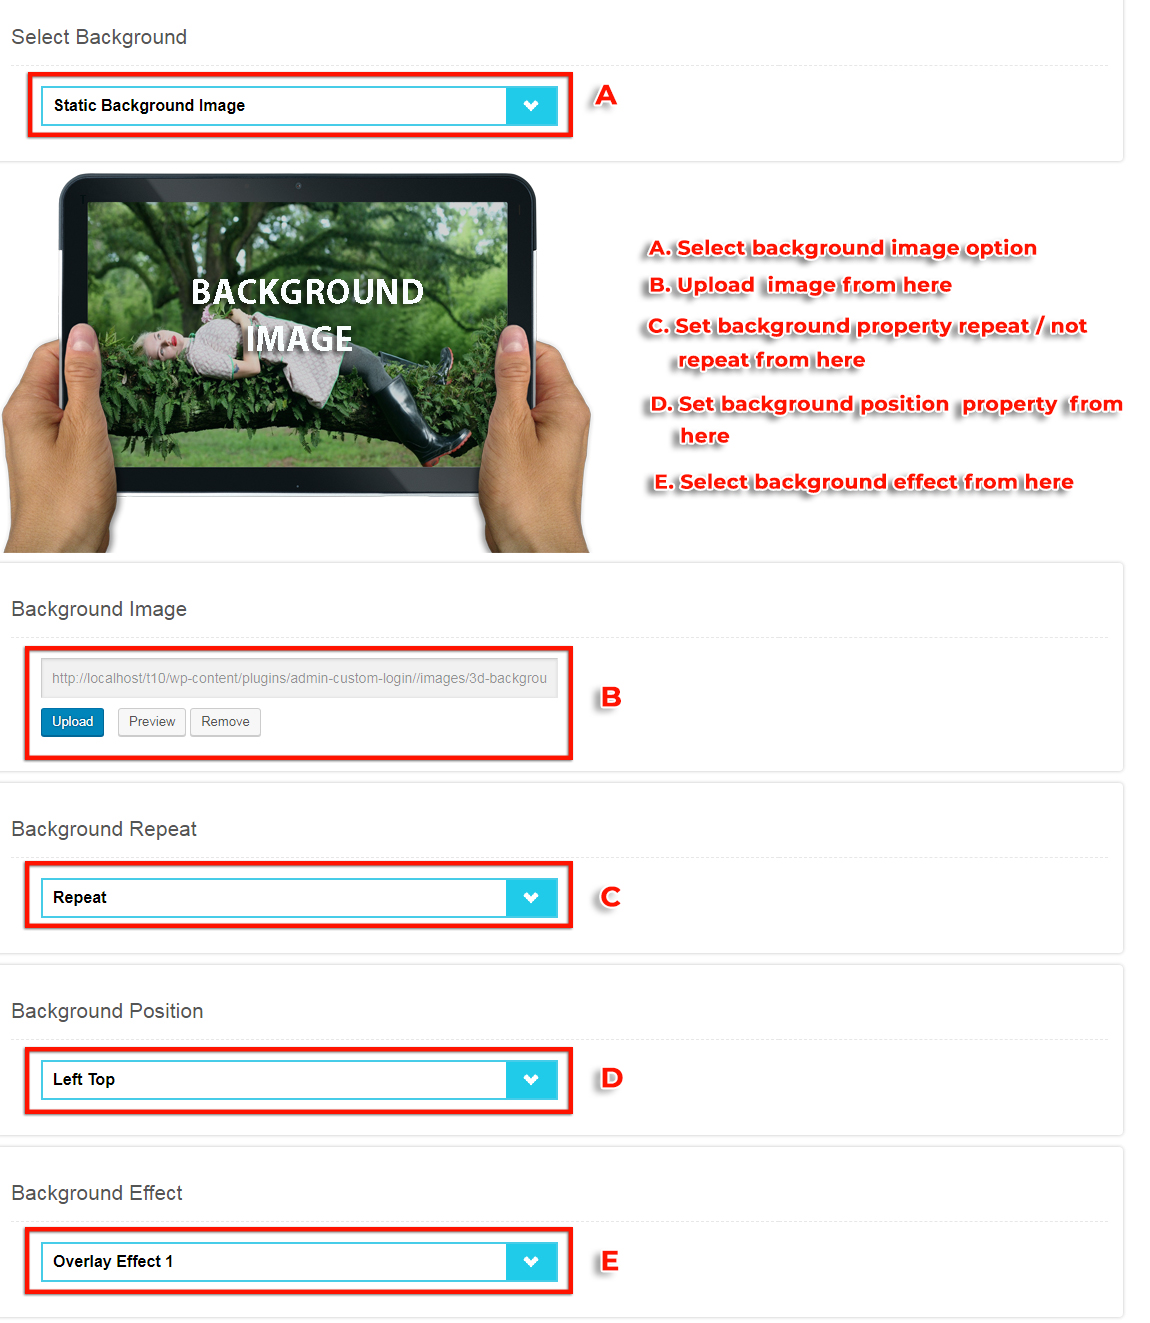
b) Background Image Select ‘Static Background Image’ for the set background image on your login form. One can customize the background image and other option like stretch background or background repeater, position, and attachment. Click to upload button a media up-loader panel is open. You can upload an image from your computer or media library.
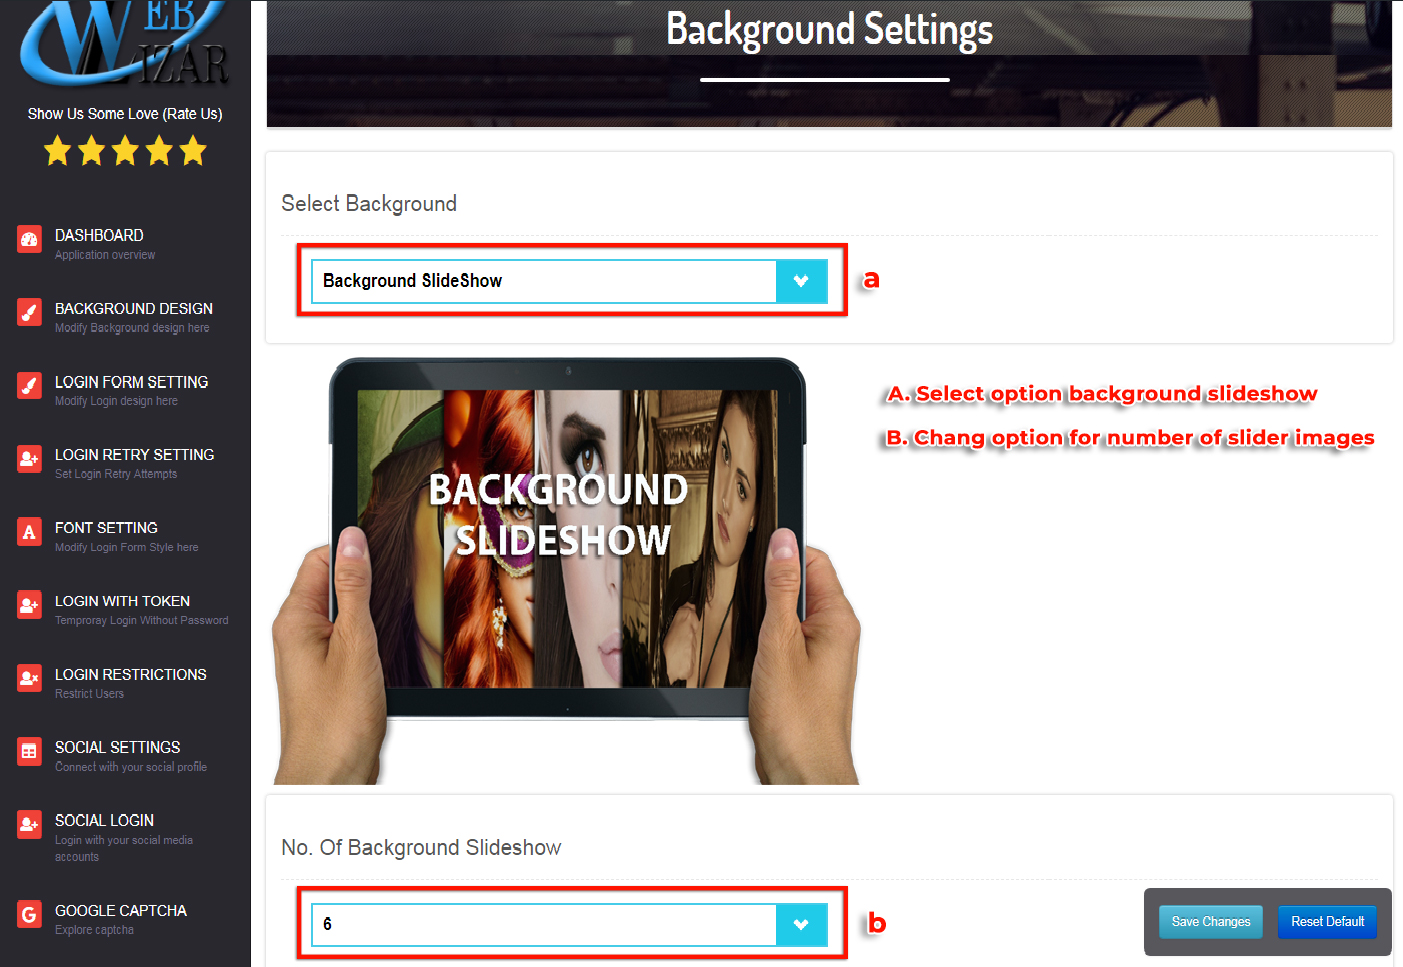
c)Background Slide Show This is our most key feature of this plugin. We have provided you our best to add the slideshow on your custom login background without any hesitation.
Select ‘Background Slider Show’ to set slider on background
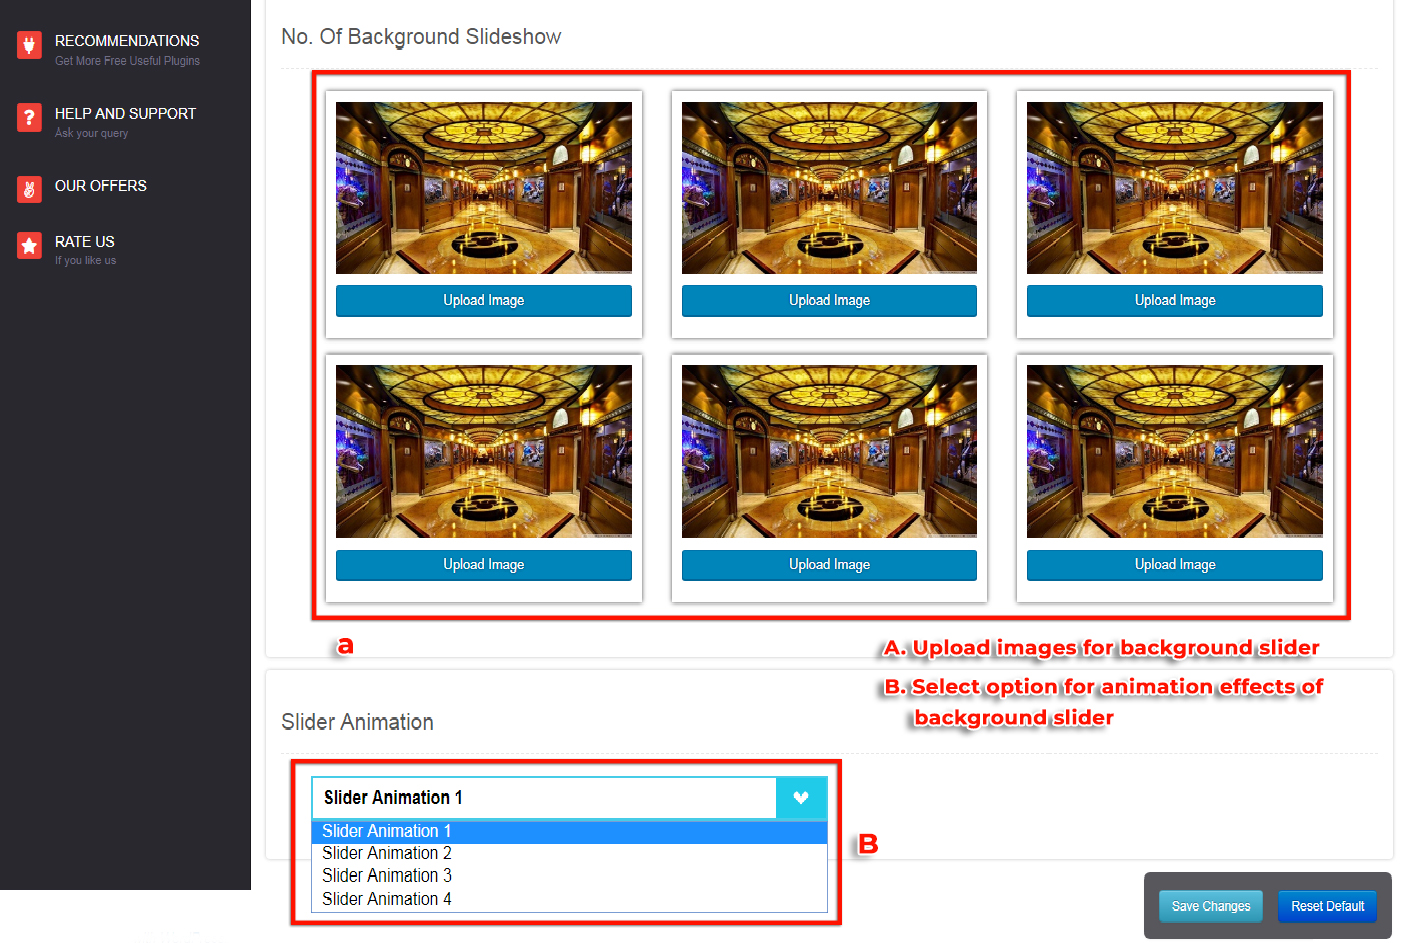
Set number of slides which you want to show in the slideshow, You can set up to 6 Maximum Images for the slideshow.
5. Login Form Setting
Click to Login Form Setting menu tab to access setting for the login form. Options available for the Login Form Setting:
- Login Form Background Color
- Login Form Background Image
- Login Form Border
a) Login Form Background color: Select ‘Static Background Color’ from the Select option, choose the background color of your login form and click on ‘save change’ button to apply changes. You can also set the opacity of background color.
b) Login Form Background Image: Select ‘Static Background Image’ for the set background image on your Login Form. One can customize the background image and other option like background repeater and position. You can apply background effect over the background image to make it more attractive.
c) Login Form Border & Shadow: You can set Login Form Width, Border Color, Border Radios, Border Style, Border Thickness, Login Form Shadow & Shadow Color.
6. Login Retry Setting
Click to Login Retry Setting menu tab to access the setting.
Here you will find two fields:
- Maximum Login Attempts
- Time Duration
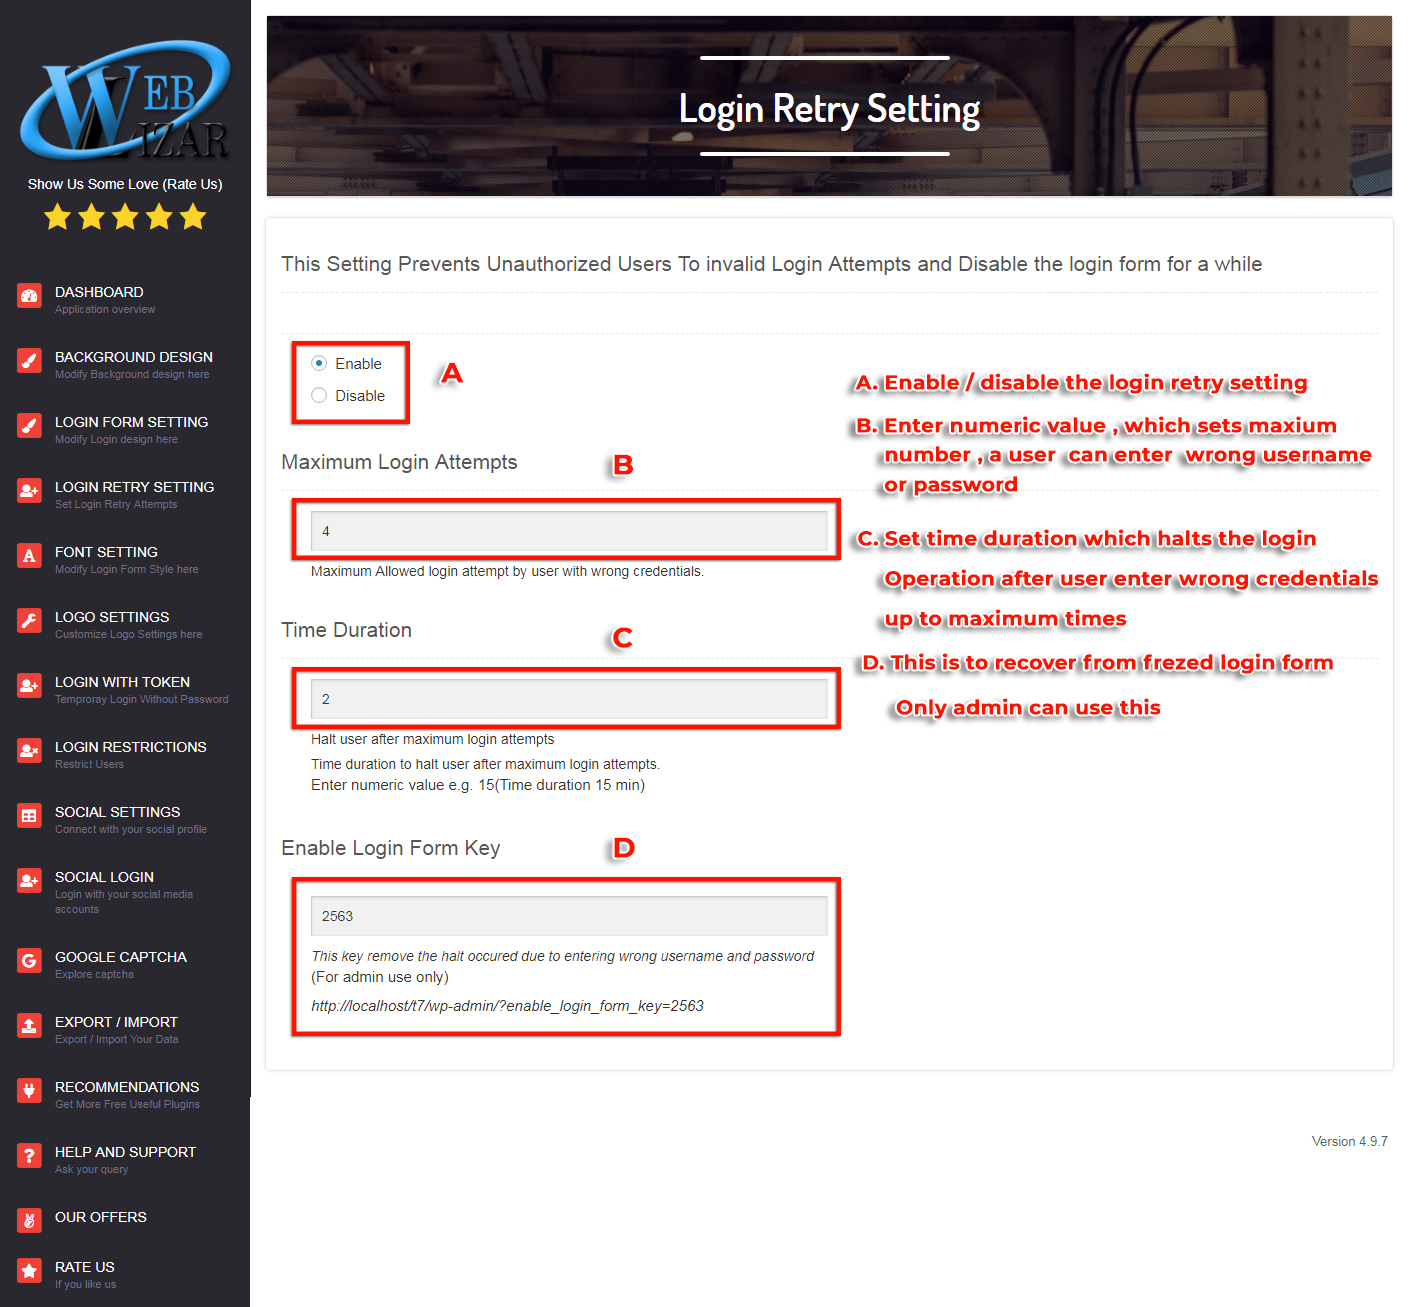
In “Maximum Login Attempts“, enter the number, how many times you let a user retry login if the user entered wrong username or password repeatedly.
And in “Time Duration“, enter time in minutes (e.g. 15).
After reaching the maximum number of retries for example if you enter 3 and user entered wrong username and password all three times then the user can log in only after the time duration you saved.
7. Font Setting
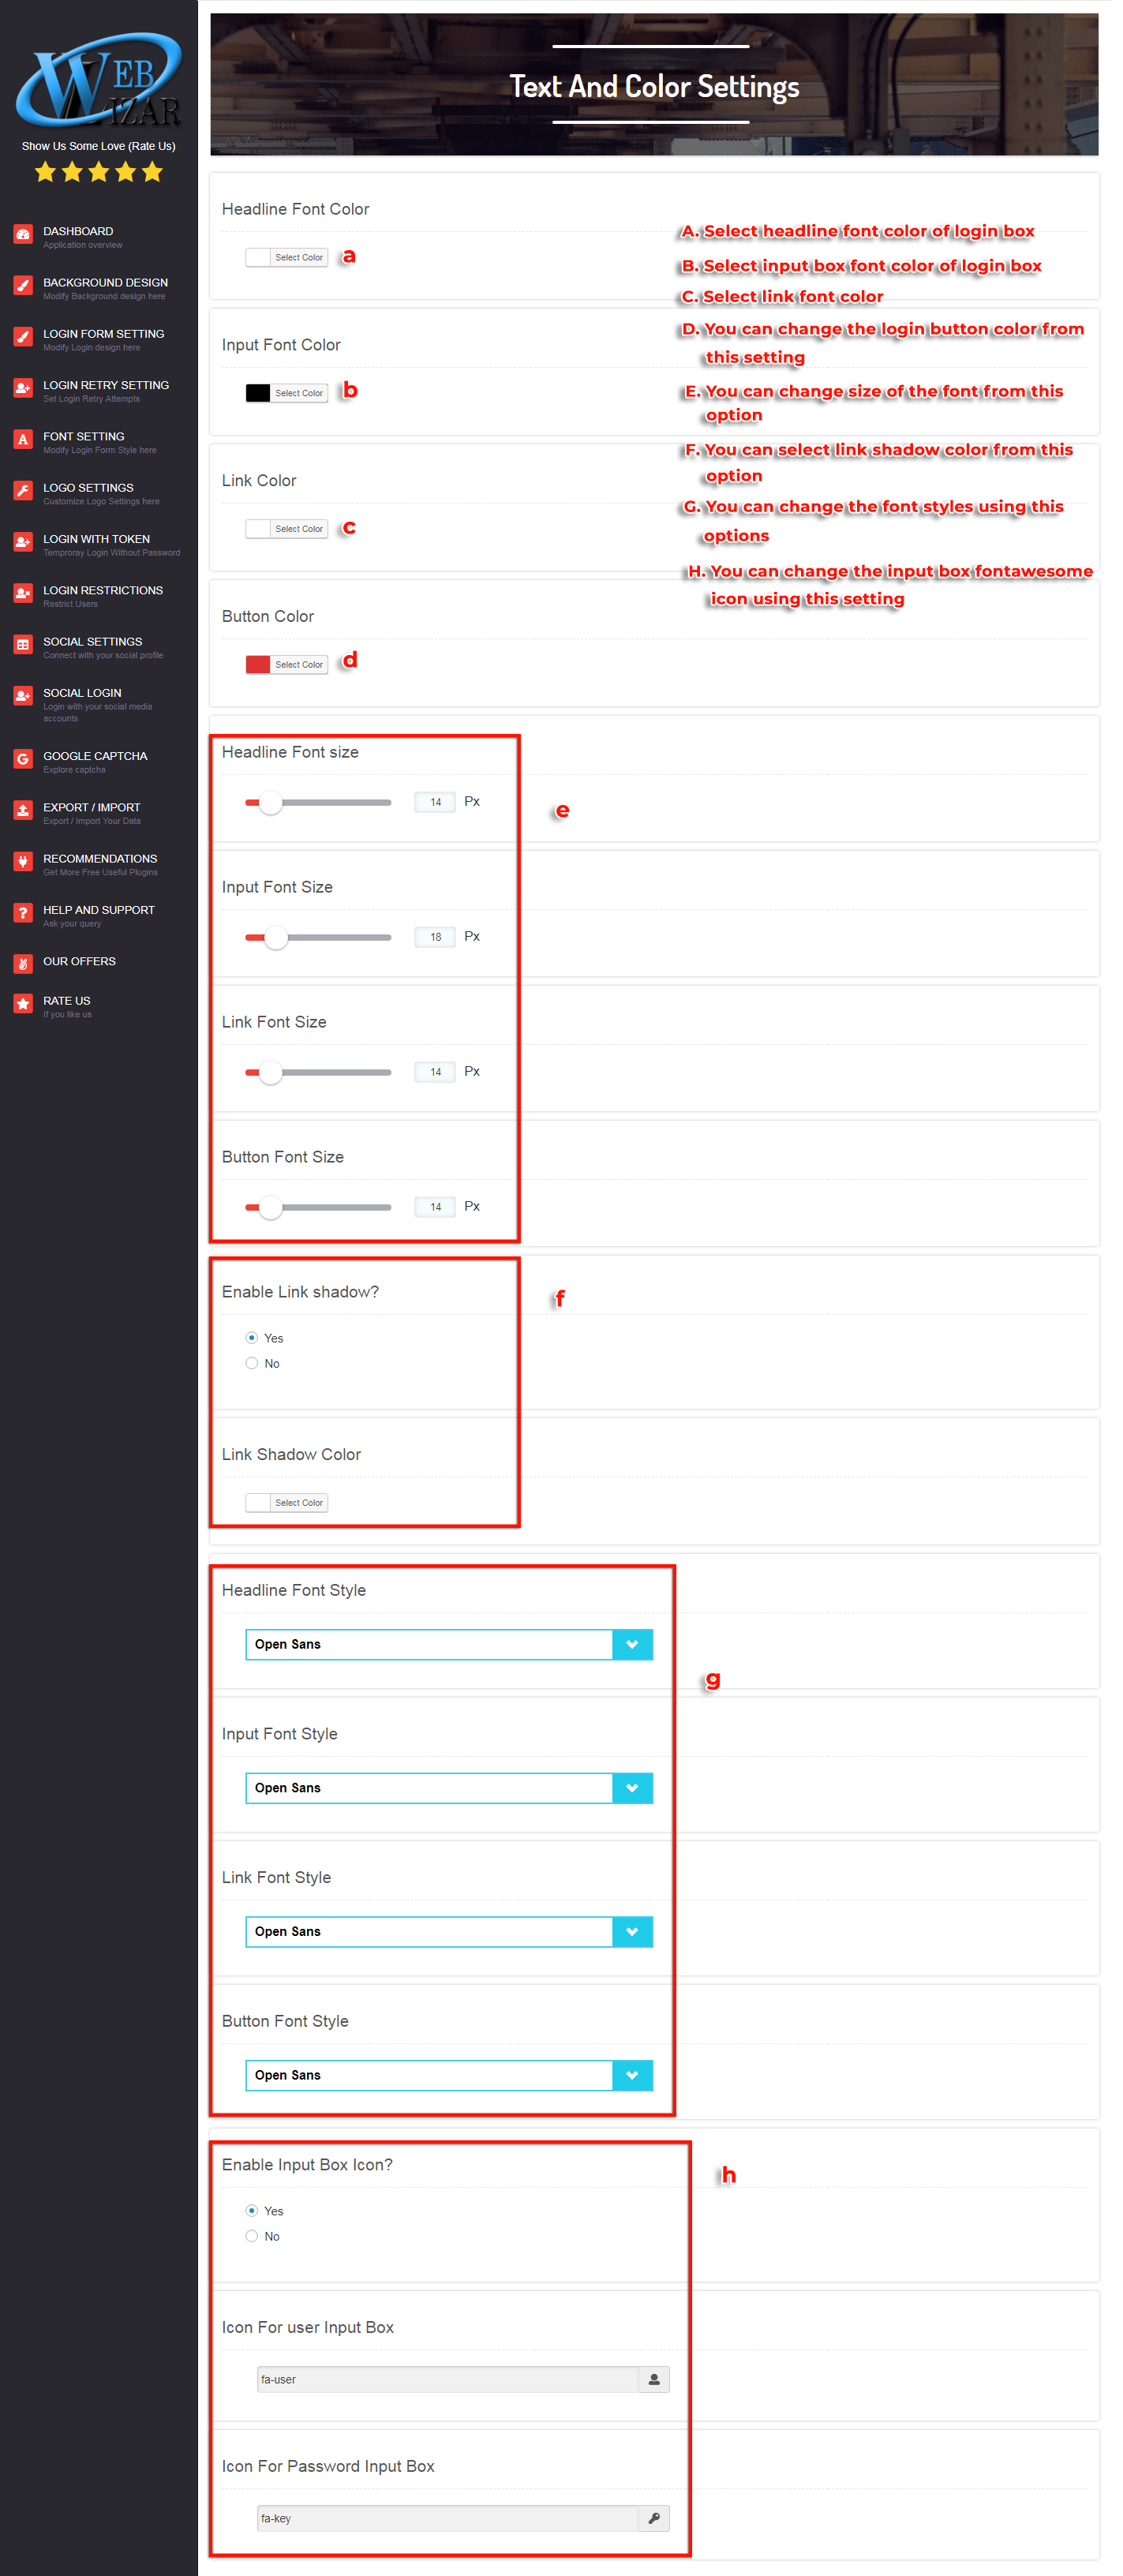
Click to Font Setting option menu for Change Text and Color Settings of Login Form. You can customize Color, Size and Font Style of using below options.
8. Login With Token
Click to Login With Token Setting menu tab to access the setting.
Temporary login without password gives the site owner a choice to select user roles and create accounts depending on their roles for the limited time for outsiders like if theme developer wants admin panel access then just enter developer’s email address, select role and time duration to generate the access. The benefit of this temporary access is, after the set time duration (e.g. 1 day), the external user can’t log in into systems.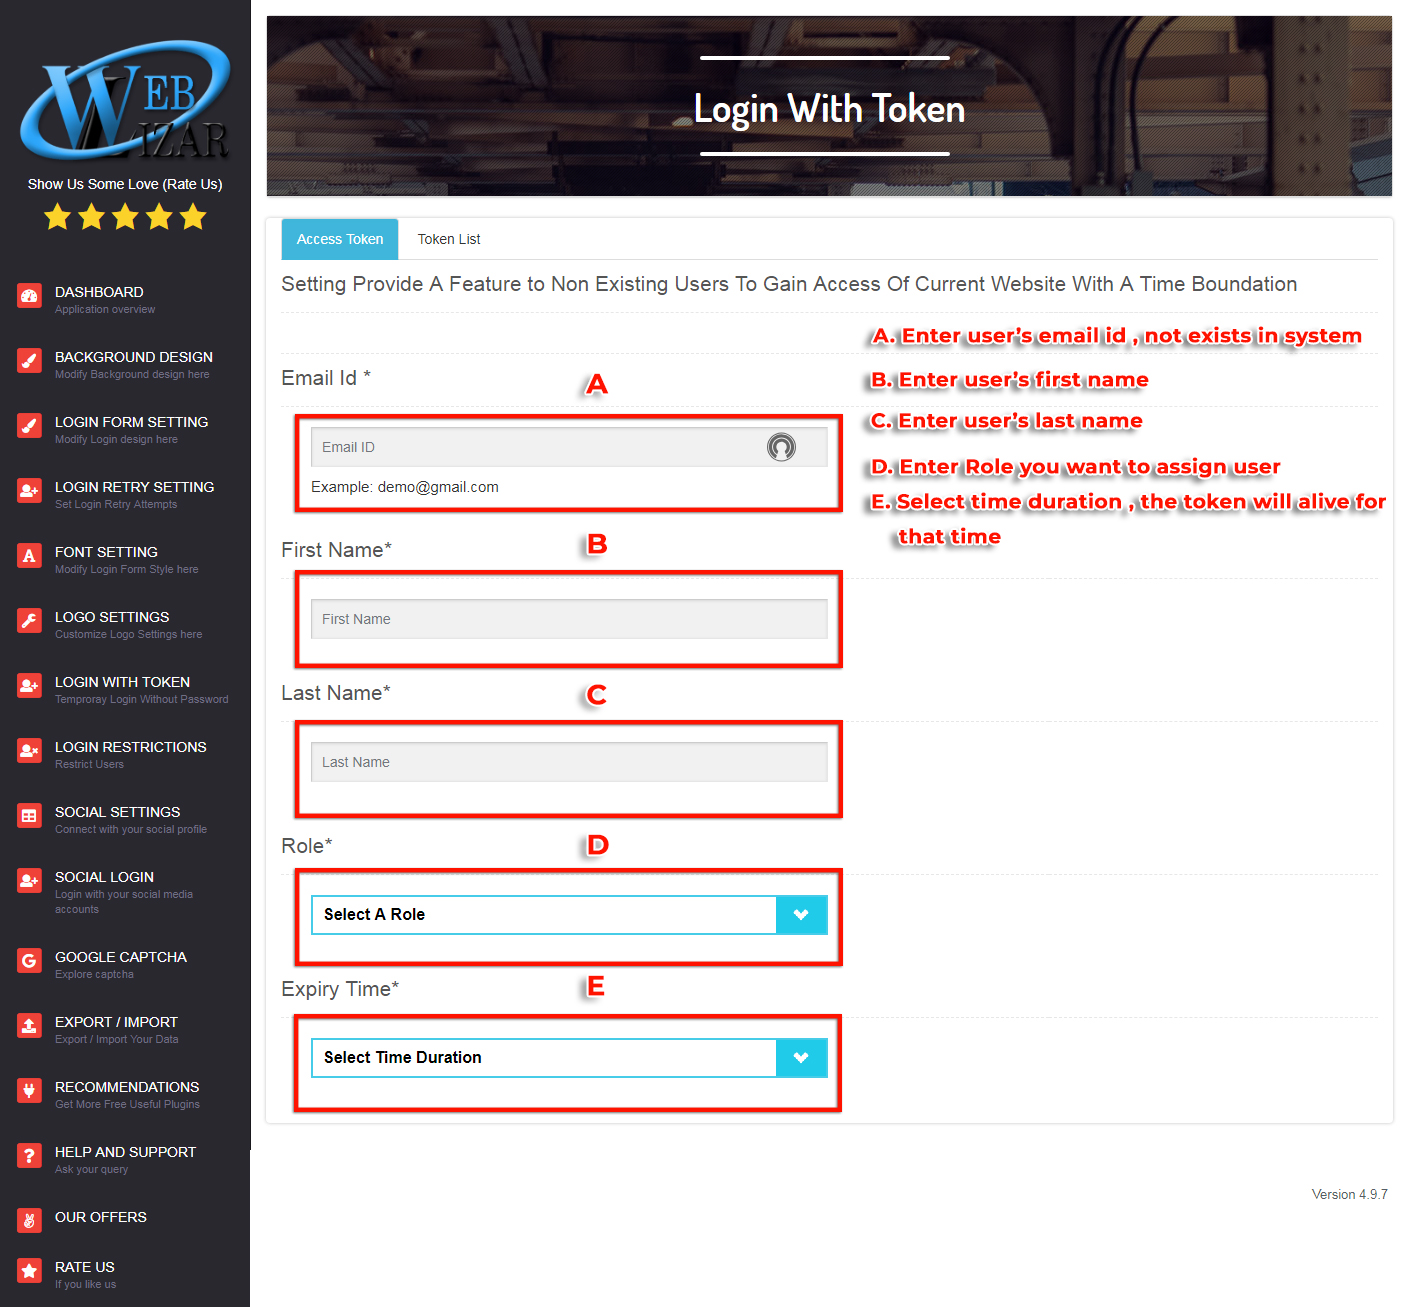
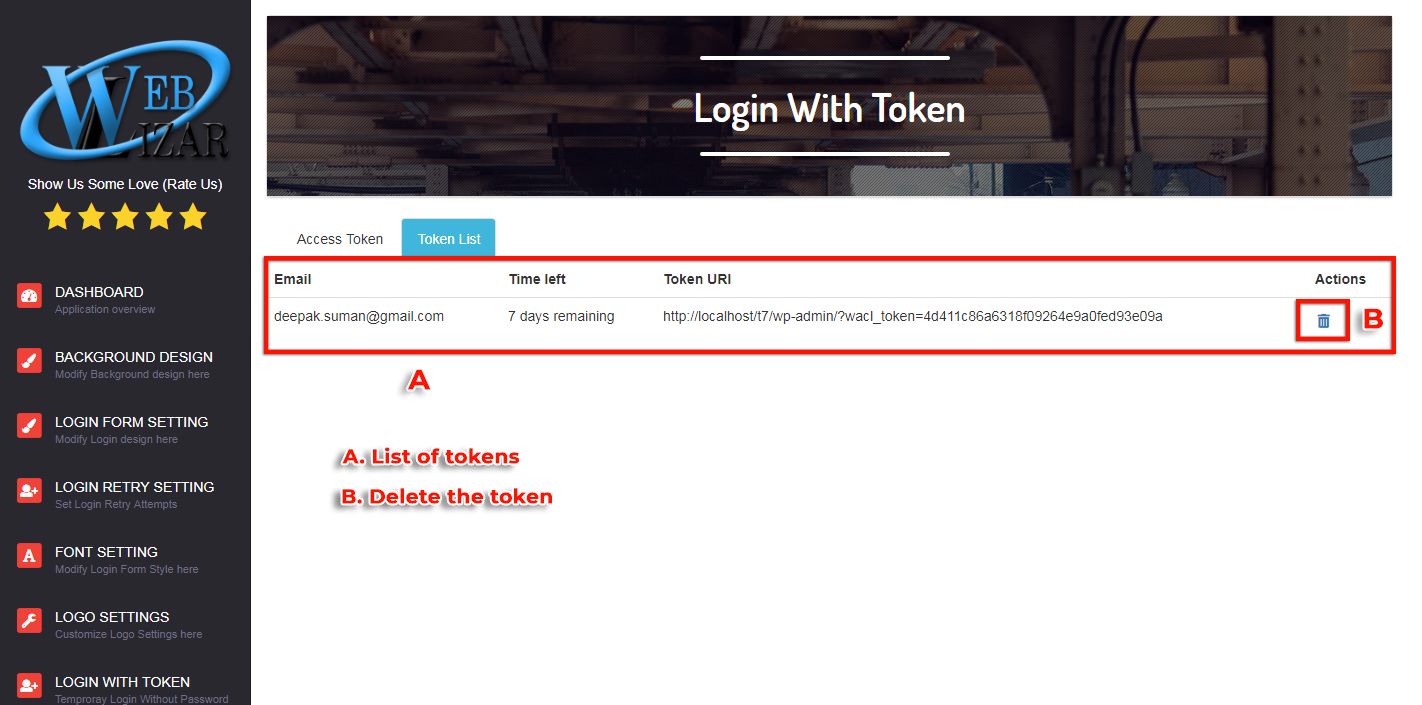
Click on Token List to get the list of generated temporary login URL.
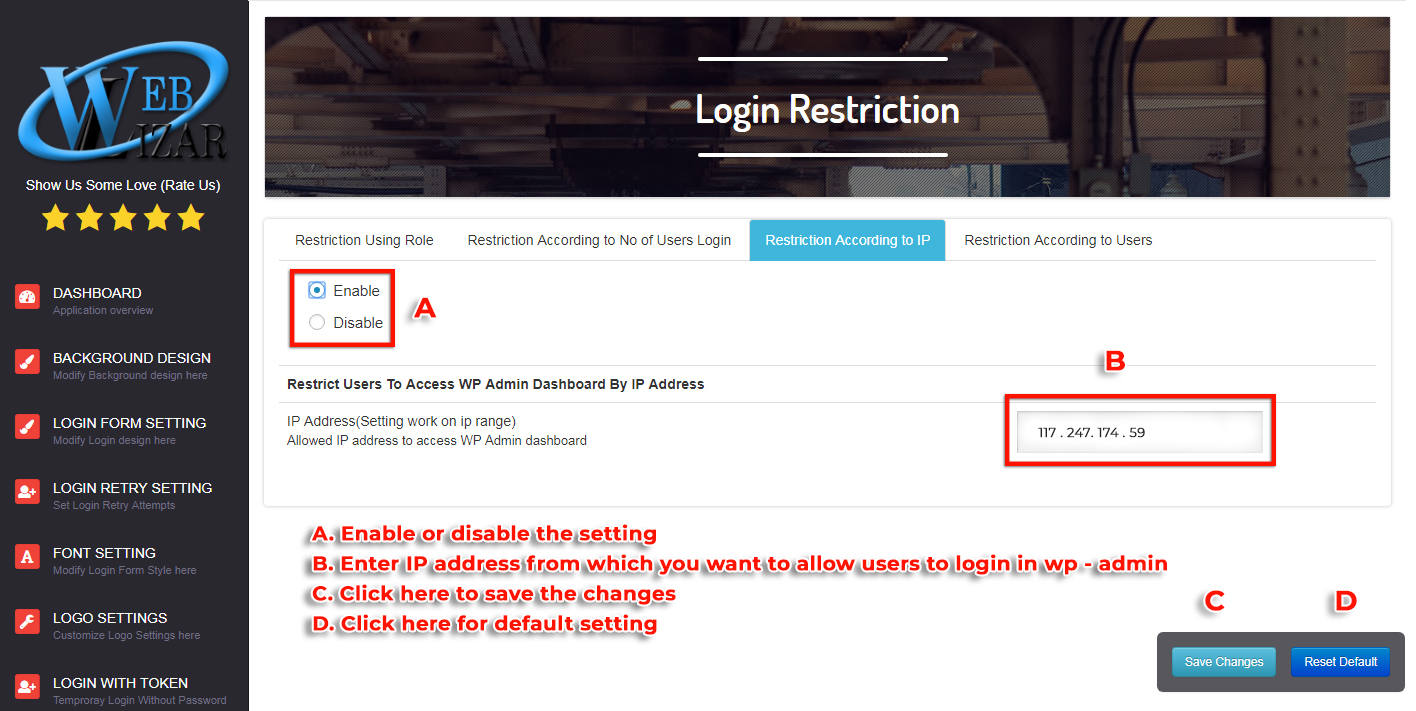
9. Login restriction
Click to Login Restriction menu tab to access the Restriction setting. We can restrict a user in four ways
- According To Role
- According To No Of Users Log In
- According To IP
- According To Users
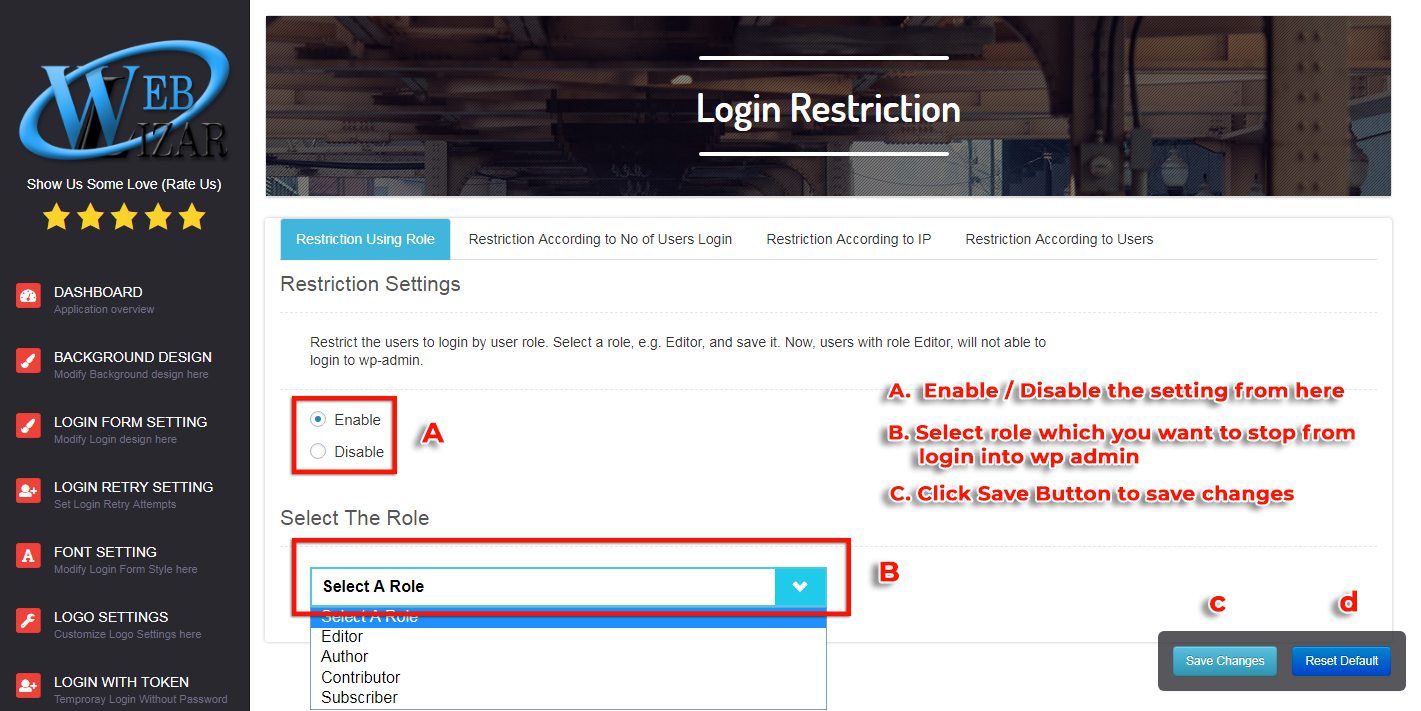
a) According To Role:
Enable the setting then select a role from the dropdown and save the settings.
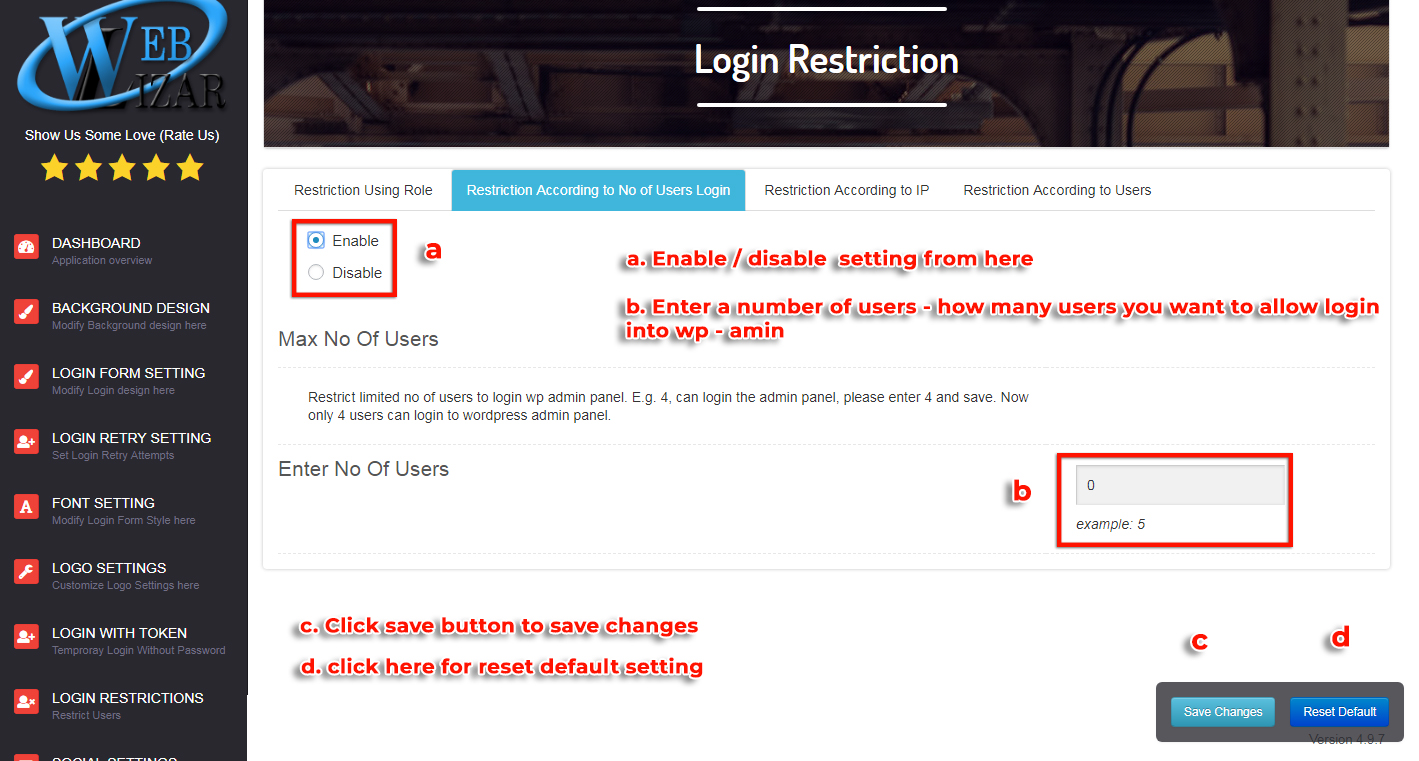
b) According To No Of Users Log In: Enable the setting then insert a number of users you are allowing to log in simultaneously and save the settings.
c) According To IP: Enable/disable the setting then insert an IP Address and save the settings. Now If this ip address match with users’ IP address users are allowed to log in to the wp-admin panel.
d) According To Users: Enable the setting then select multiple users from the table and save the settings. These selected users will not allow to login to the wp-admin panel. It does not depend on the user role.

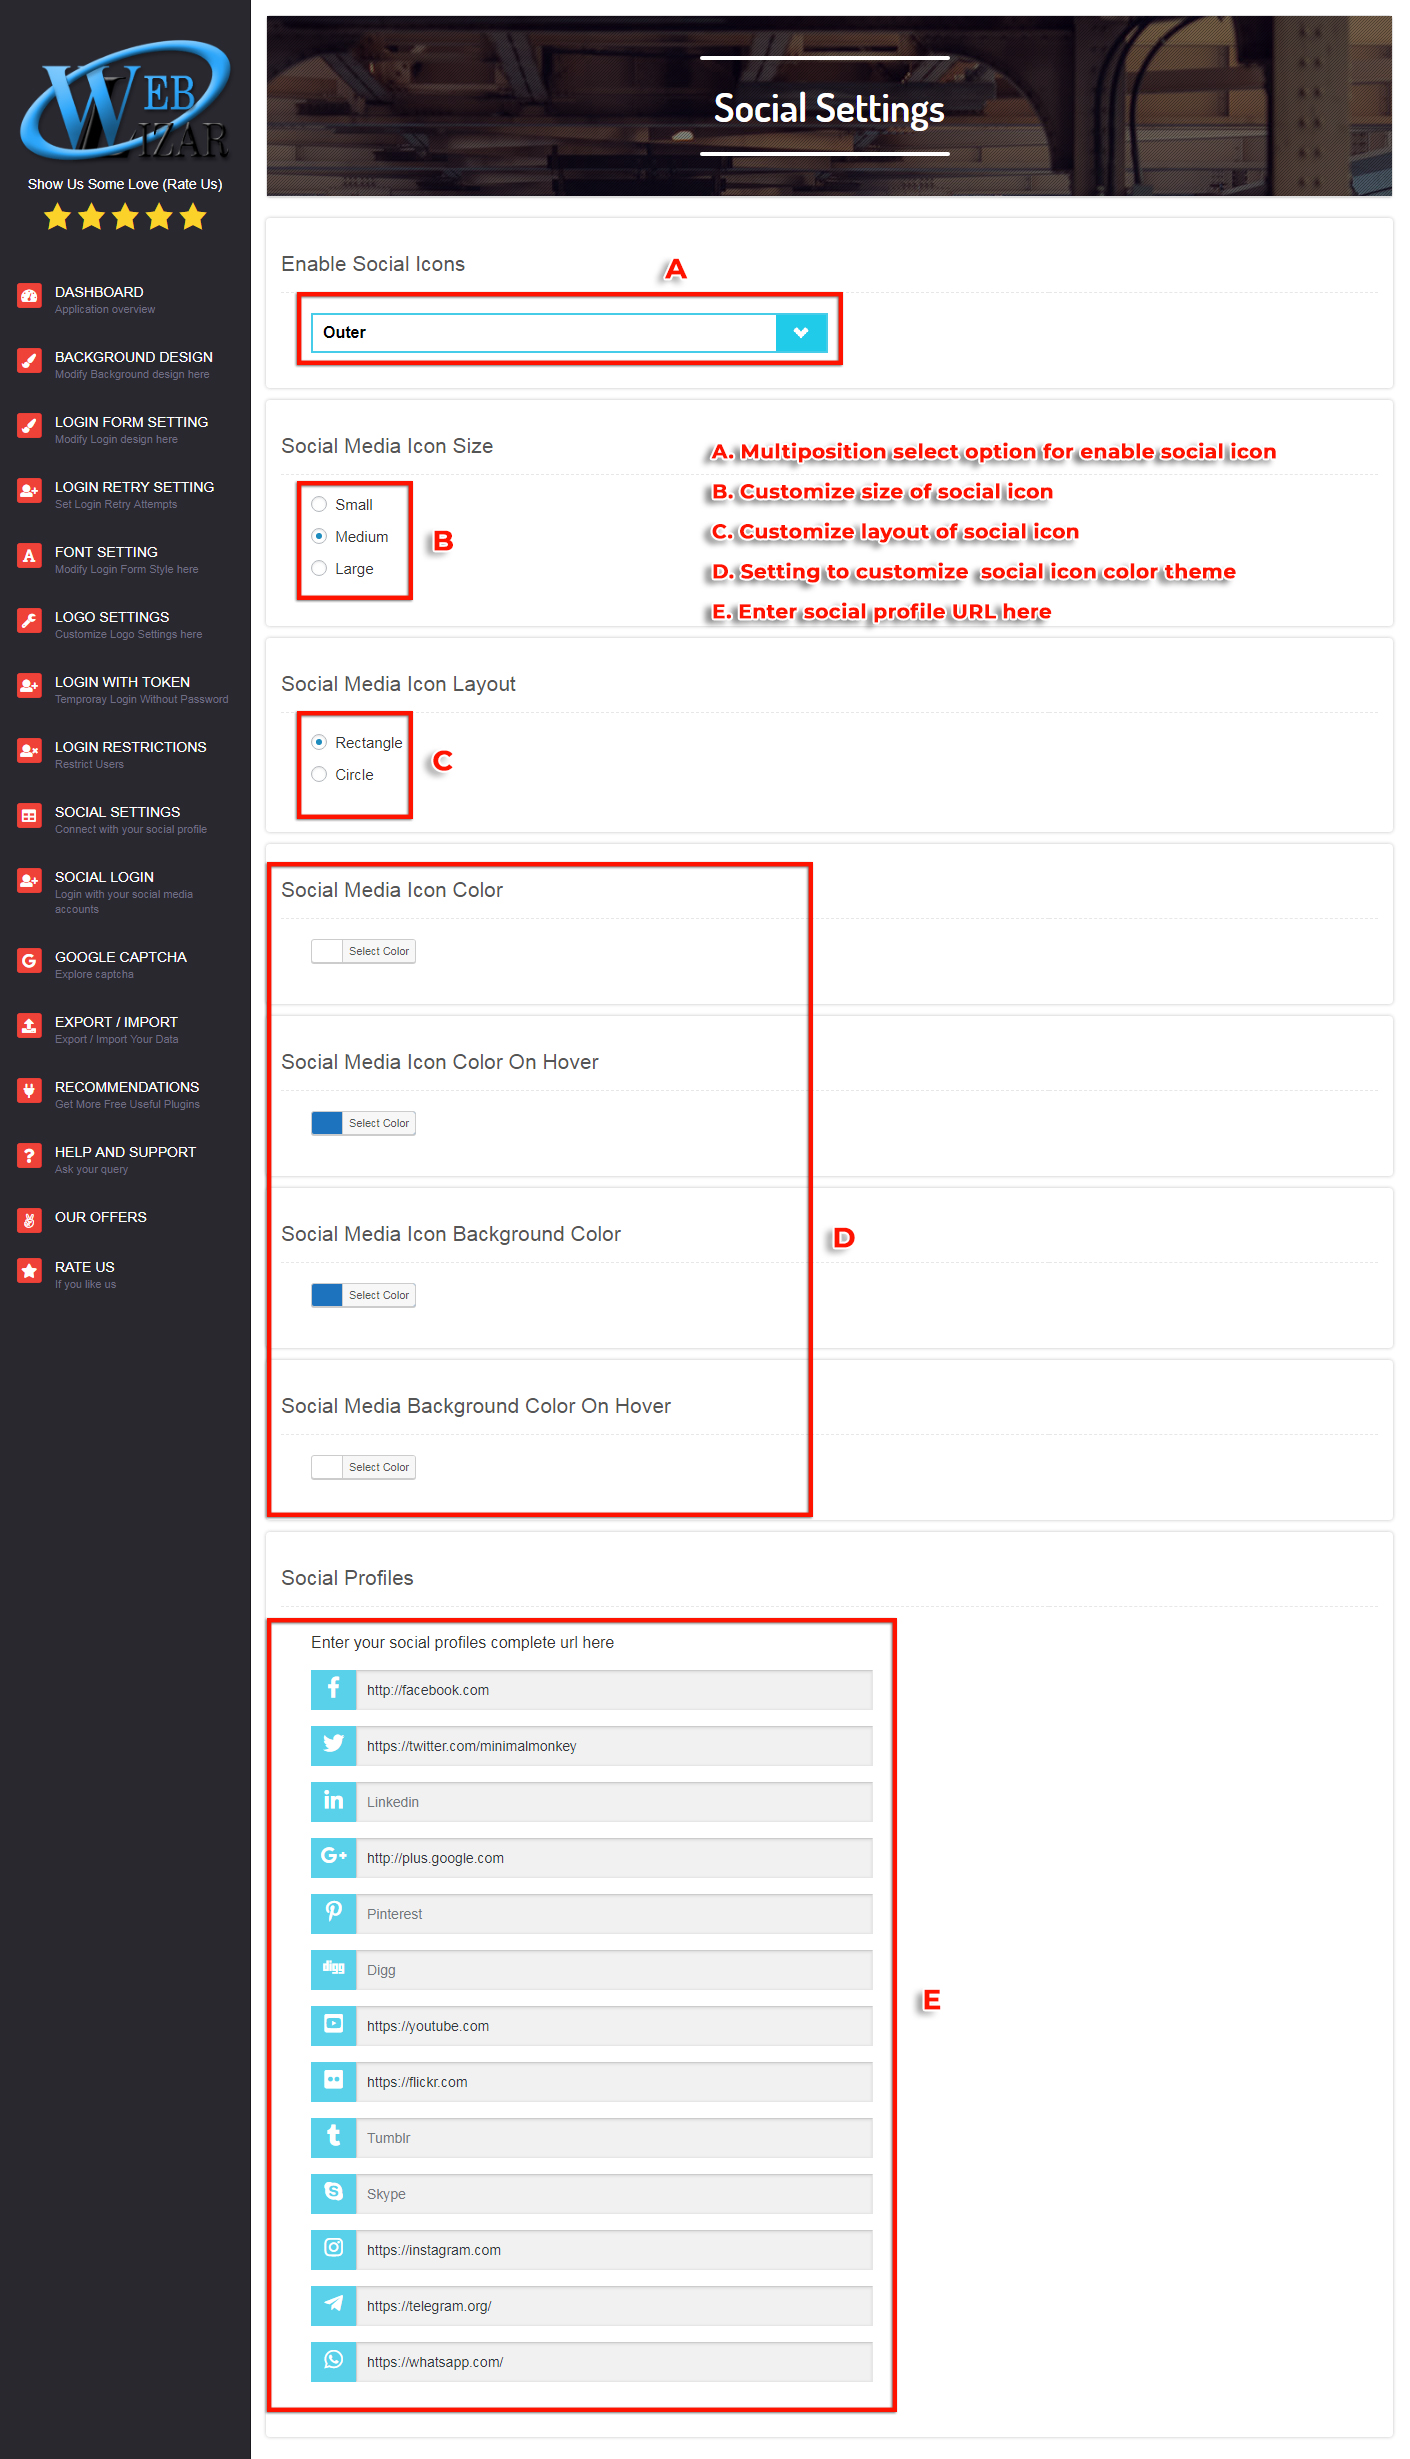
10. Social Setting
Click to ‘Social Setting’ tab menu allows you to share your social profile on login form page.
You can show the following social media profiles URL :
- Google+
You can add social icon in inner and outer area of login form and also on both area. You can also customize their Size (like small, medium, large), Color, Layout (like Rectangle, Circle) etc.
11. Social Login
Click to ‘Social Login’ tab menu allows you to Register and login with your social profile in WordPress Admin panel.
You can see the following social media Settings :
Enable any of or all social media setting and enter client secret Id, app id generated from Twitter, Facebook, Google, and save the settings.
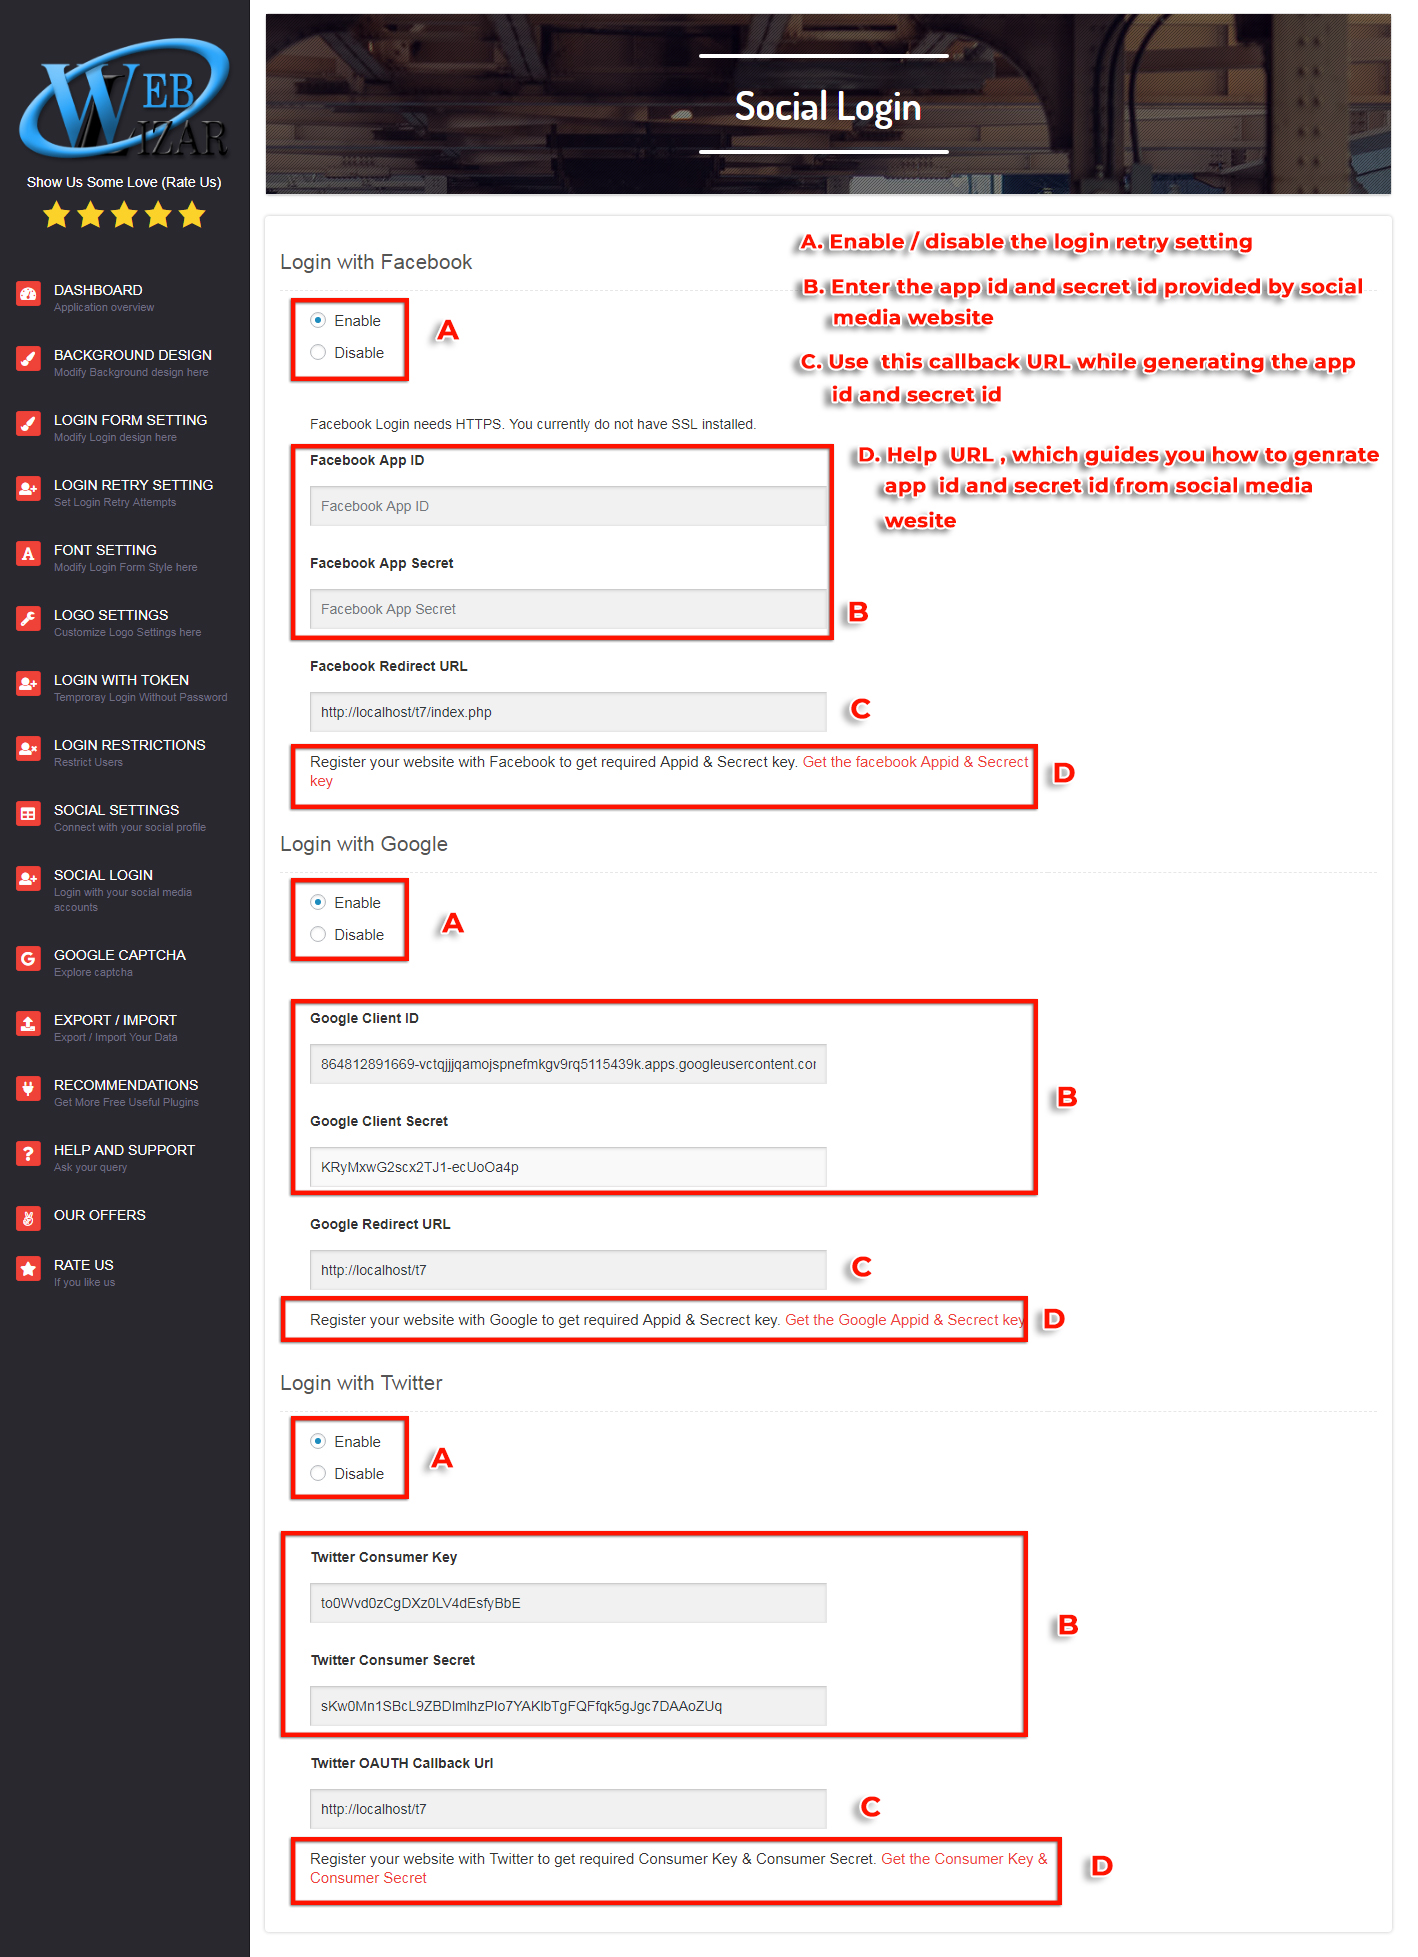
Note: Social Login will only work on top level domain(s).
To Generate Facebook App Id and App Secret Id.
To Generate Google Client Id and Secret Id.
12. Google Captcha
Google captcha protects your site from spam and abuse. It uses advanced risk analysis techniques to tell humans and bots apart. To use this service, please enter the Site key and Secret key.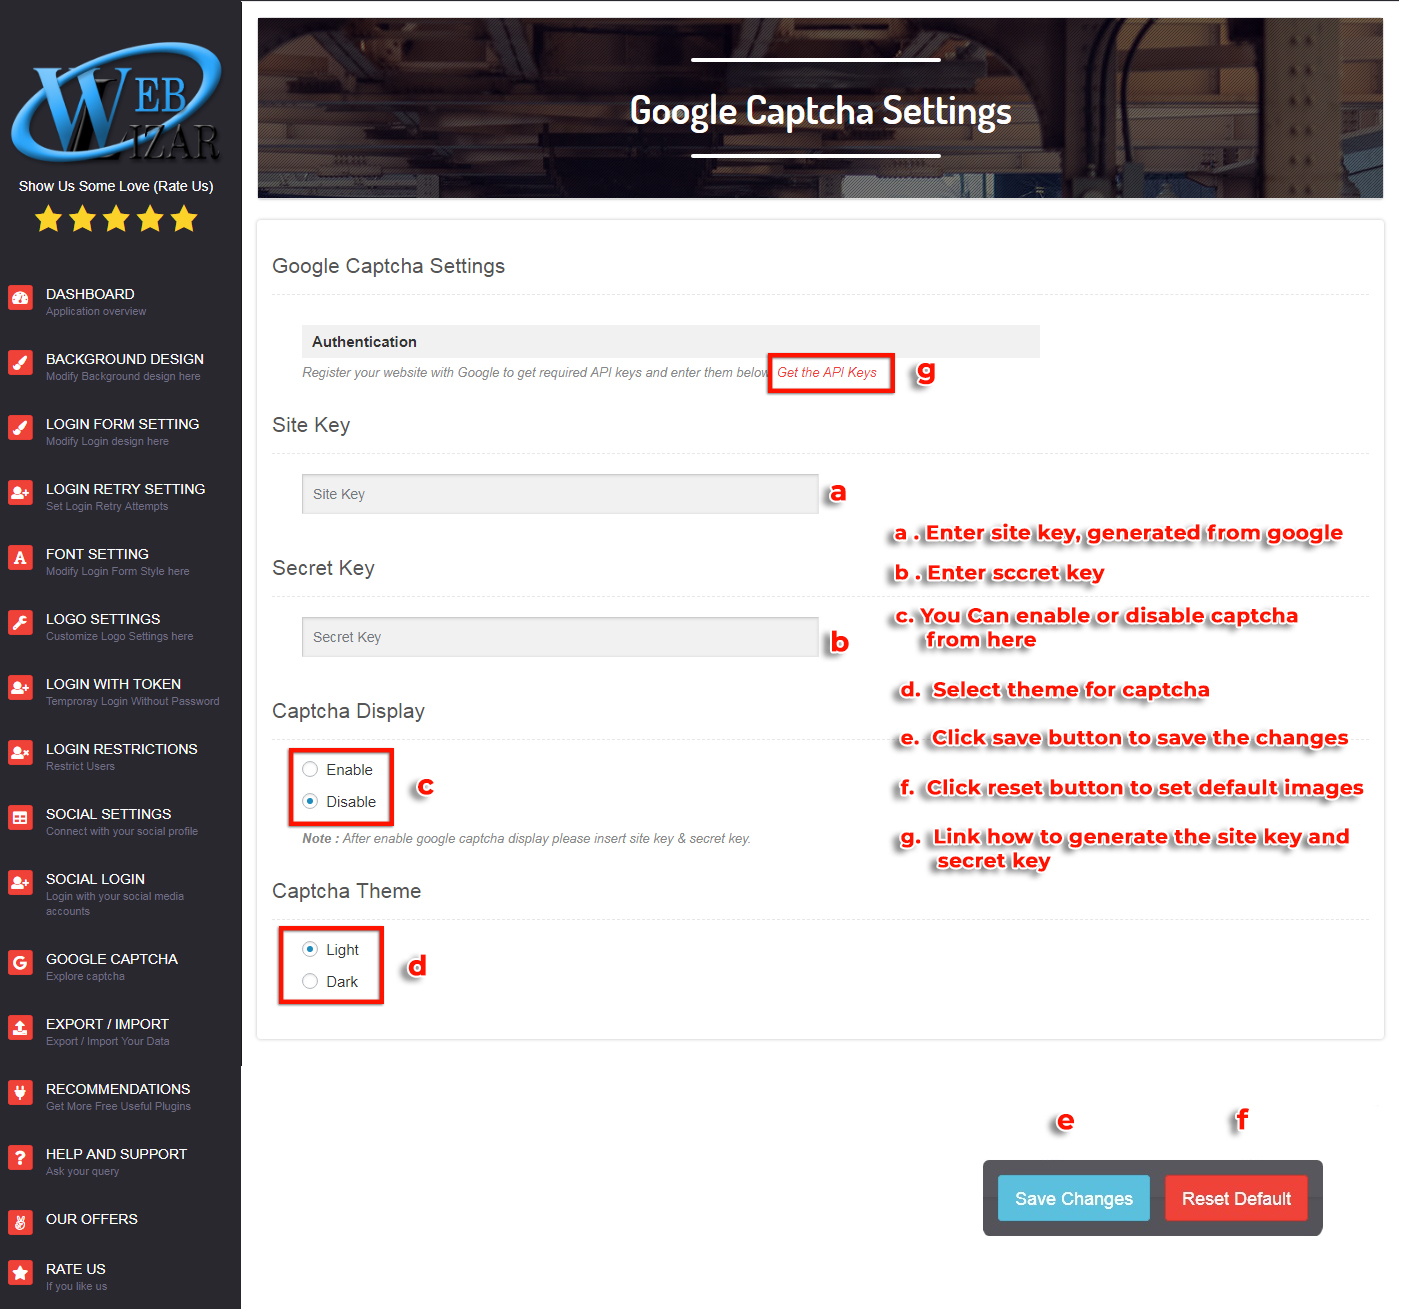
Please refer this link to generate the Site key and Secret Key.
13. Import/Export Setting
Export or import the plugin settings for this site as a .json file. This allows you to easily export or import the configuration into another site
14. Help and Support
If you face any trouble OR required any assistance to set up and configure the plugin, please post your query on Support Forum. We will try our best to resolve our query on the forum.
And your suggestions for more features and improvements for our plugin is really appreciated.
Thanks for reading this documentation.

