Creative Premium
Creative Premium
weblizarCreative-Premium Theme Documentation by Weblizar
Index:
1. Theme Installation:
First download your theme package from your Weblizar A member Account. Login with created username password.Below given user panel
Upload Theme package zip folder using theme installer WordPress option Otherwise Any FTP (FileZilla)…
We recommend you to upload extracted folder using FTP( FileZilla/Bitwise), In your host-server-directorywp-contentthemes
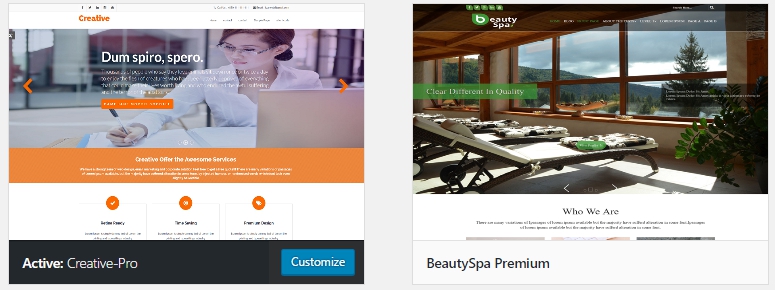
After that Activate theme to go under WordPress site Admin Dashboard -> Appearance ->themes.
Installed theme looks like this:
Goto Top
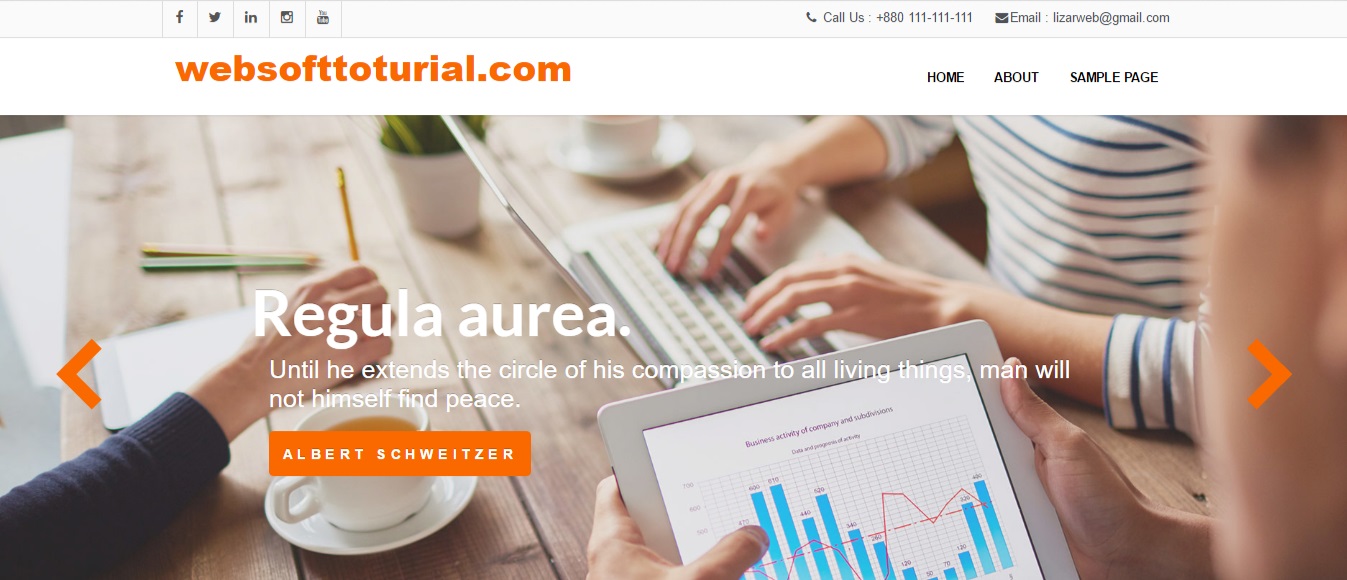
2. Front Page of The Theme:
Goto Top
3. Home Page Setup:
Our theme home page has 12 different sections. Explaining below one by one in sub points:
(a)Social & Contact info in header:
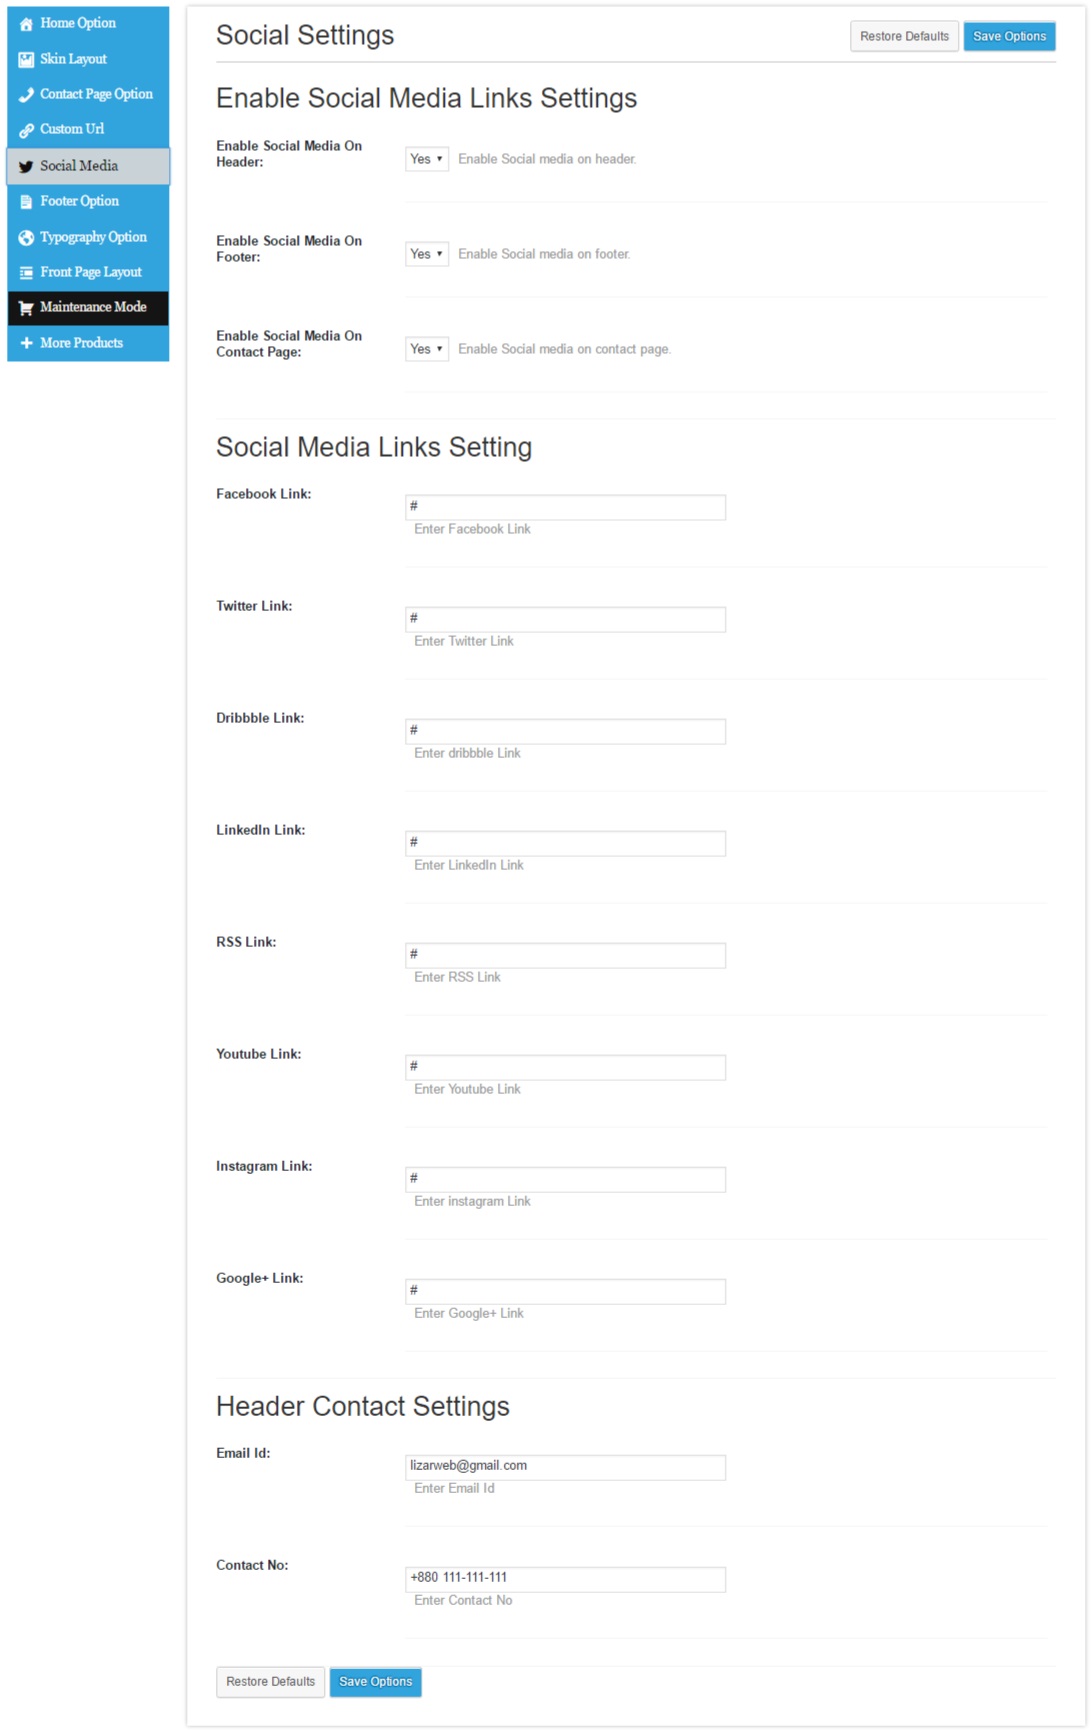
Go to Admin Dashboard >> Theme Options under Social Media tab.
Here you can enter your social media details,mobile number,email etc, that will display in header of your site.
Header Contact Info Admin View:
Header and Footer Contact Info Front Page View:
Header Contact Front View:
![]()
Footer Contact Front View:
![]()
(b) Site Logo or Title:
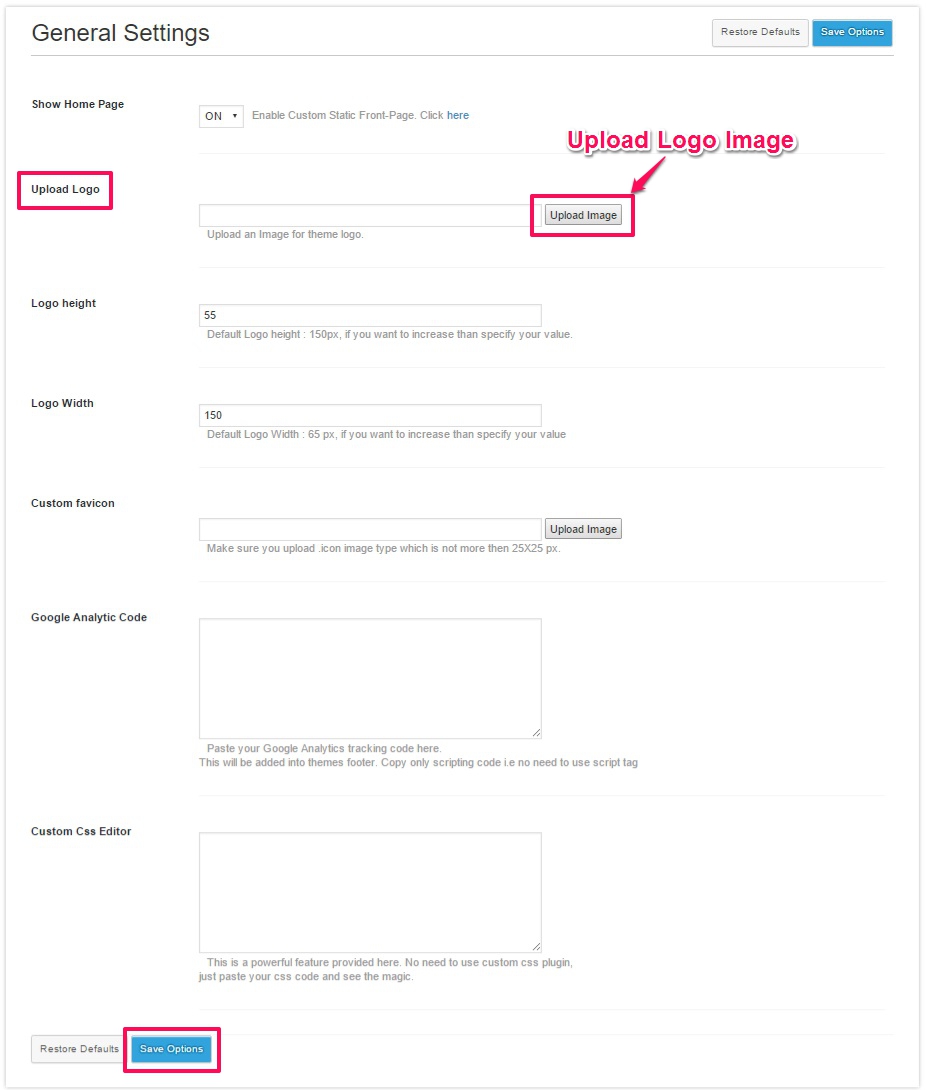
To set site logo or Text based site logo, go to Admin Dashboard >> Theme Options under General Options tab
To enable text based site title just check the Text Title checkbox.
For image logo Upload the image using Upload Logo media up-loader and set the height/width in next fields.
You can also upload site favicon icon using Custom favicon filed.
General Settings / Site Logo/Title Admin View:
(C) Custom Menu:
You can add navigation menu to your site from Admin Dashboard >> Appearance >> Menus section.
Custom Menu Admin View:

Custom Menu Front Page View and Logo Front Page View:

Goto Top
(d) Creative Slider:
Featured Slider is Third section on home page come after header logo & menu section.
Admin Dashboard → Creative Slider
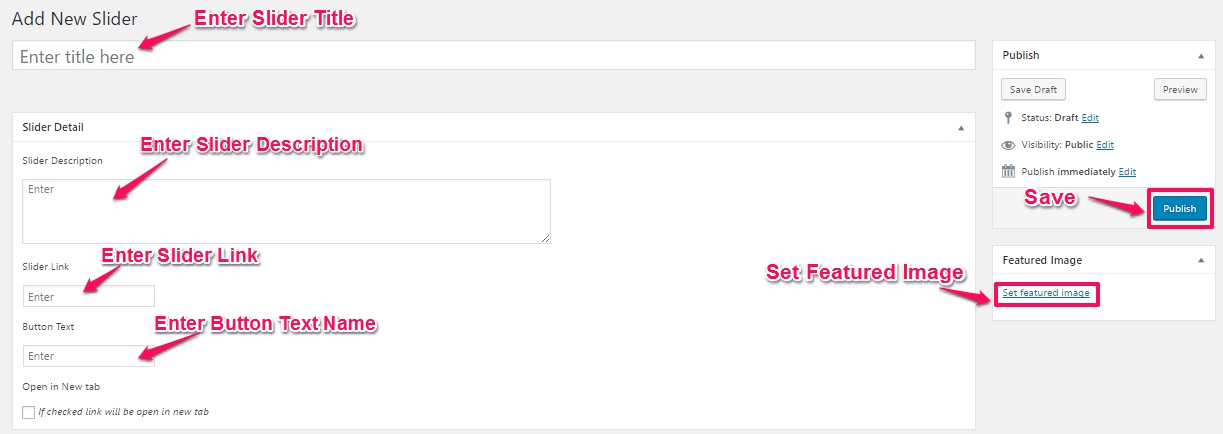
Click on Add New Slider to add new slide.
Here you can enter your slide title, slide description.
Into slide detail you can add featured image, slide button text, slide button link, target etc.
Slider Admin View:
Slider Front Page View:

(e) Creative Services:
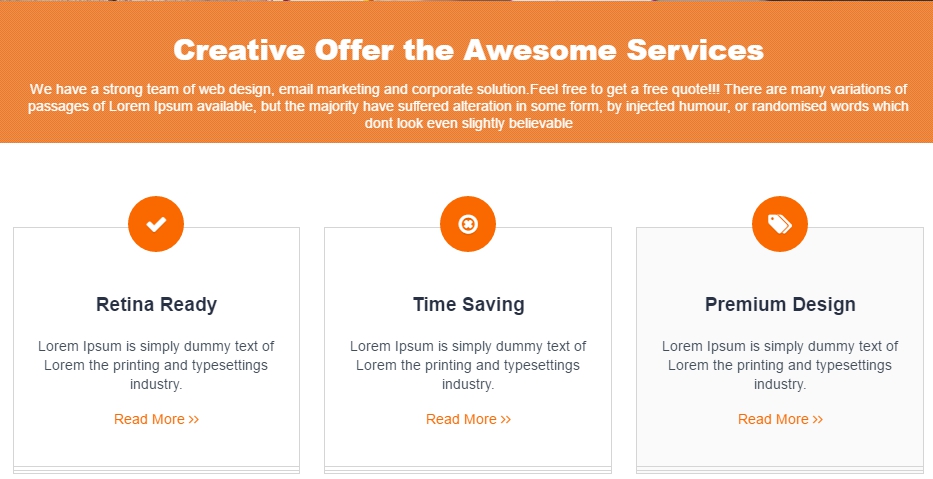
Creative Service section is fourth section on home page come after Creative slider section.
Admin Dashboard → Creative Service
Here you can enter your service tagline like title & description.
Into service detail you can add service icon or featured image, service title, description and read more button text, link etc.
- Service Admin View:

Service Front Page View:
Goto Top
Creative theme have two type of template:
1. Service one template.
2. Service two template.
For template to go to admin dashboard => pages => add new =>here add your service template details as per your requirements.
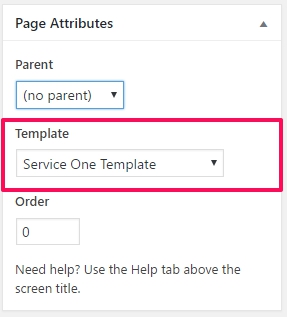
See the demo service page template;
(f) Creative Portfolio:
Portfolio Section is fifth section on home page come after Creative service section.
Admin Dashboard → Weblizar Portfolio
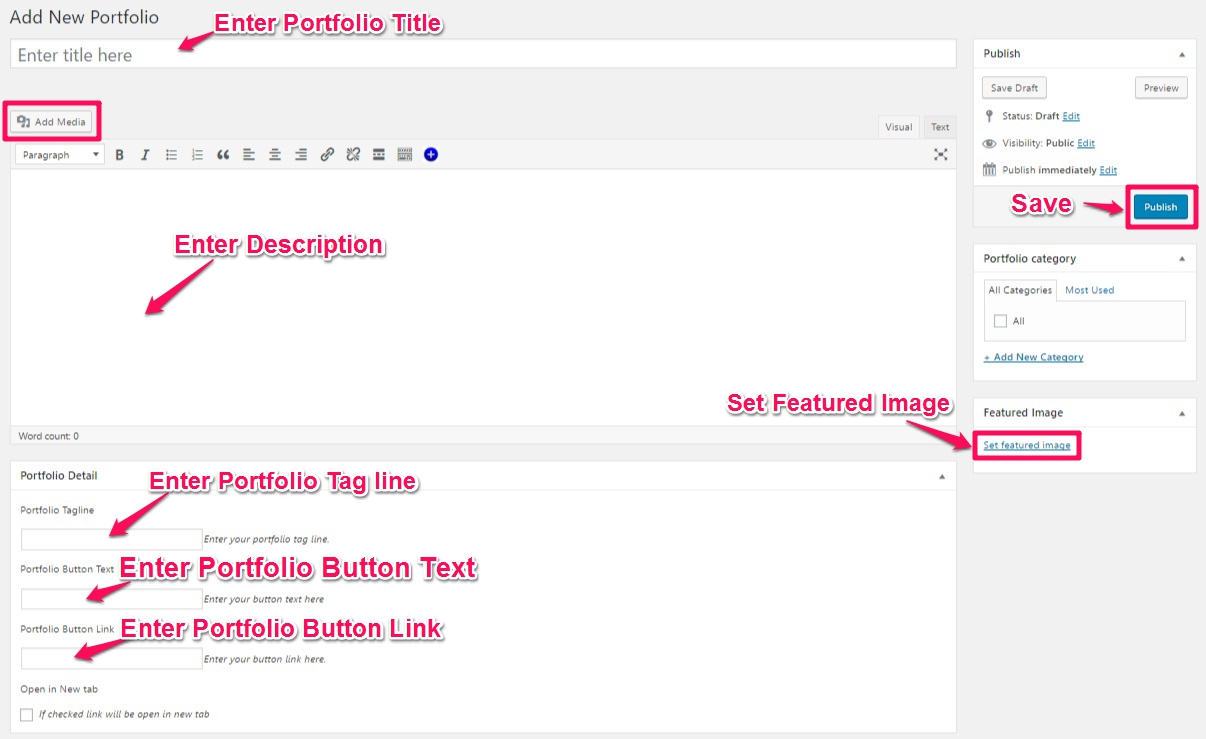
Using Add New Portfolio link in Weblizar Portfolio Menu you can add new portfolio into Weblizar Portfolio section.
Here you can enter your portfolio section tagline like title, description.
Into portfolio detail you can add title, description, designation, featured image, portfolio button text, portfolio button link etc.
Portfolio Admin View:
Portfolio Front page View:
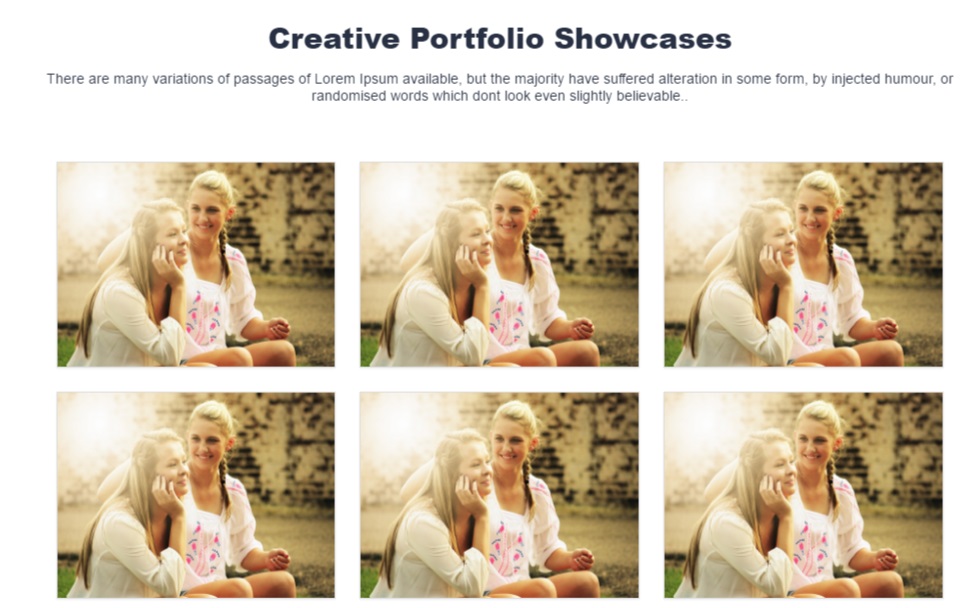
Creative theme have four ( 4 ) type of templates:
1. Portfolio full width template.
2. Portfolio two template.
3. Portfolio three template.
4. Portfolio four template.
For template to go to admin dashboard => pages => add new =>here add your portfolio template details as per your requirements.
See the portfolio page template demos
1. Portfolio full width template.
Goto Top
(g) Creative Random Fun-Facts:
Random Fun-Facts Section is sixth section on home page come after Creative Portfolio section.
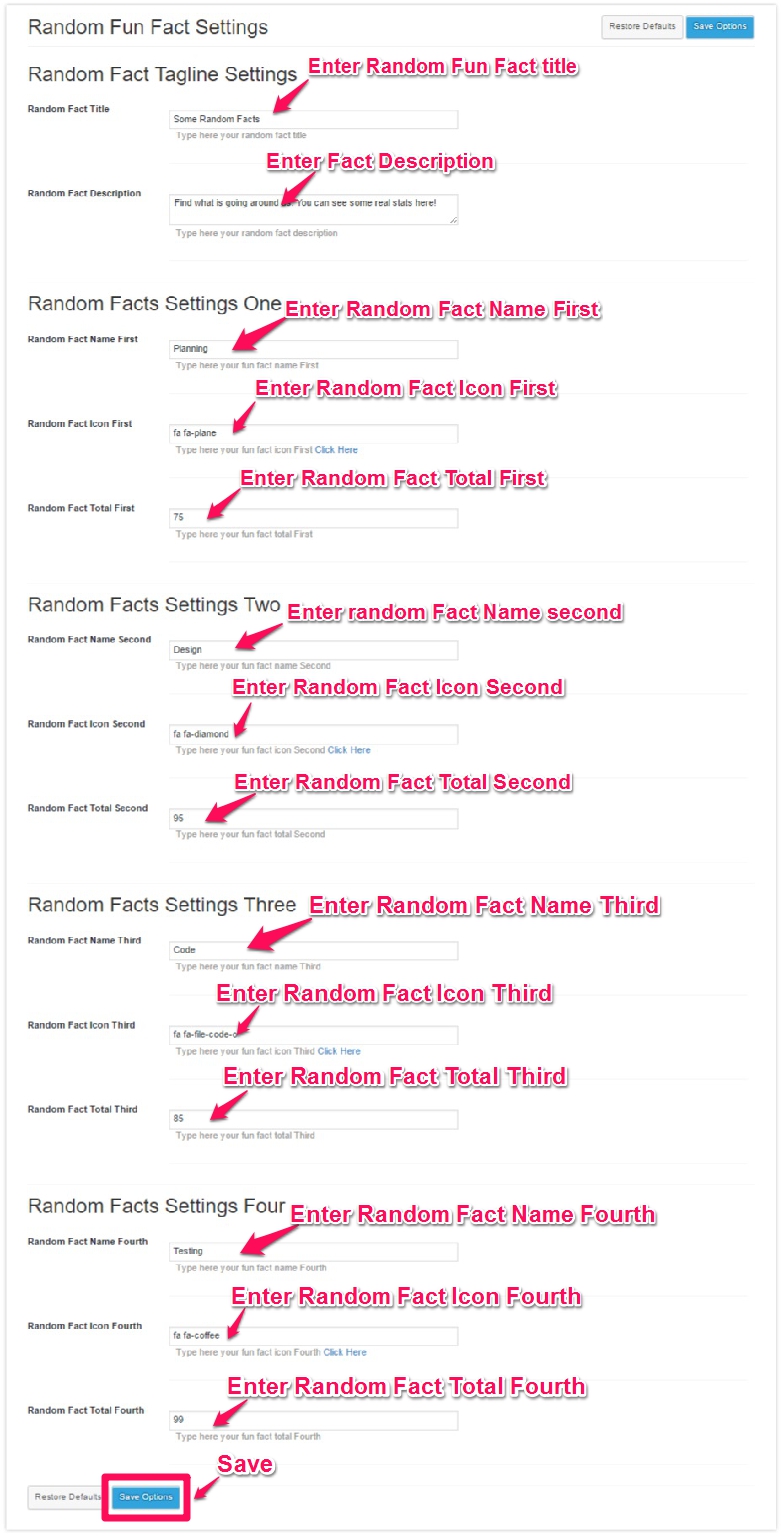
Appearance Menu → Theme Options → Fun Fact Option.
Here you can enter your random fun-fact section tagline like title, description.
Into random fun-fact detail you can add fact name, fact icon, total facts etc.
Random Fun-Facts Admin View:
Fun Facts Front Page View:

(h) Creative Testimonial:
Testimonial Section is seventh section on home page come after Creative Random Fun-Facts section.
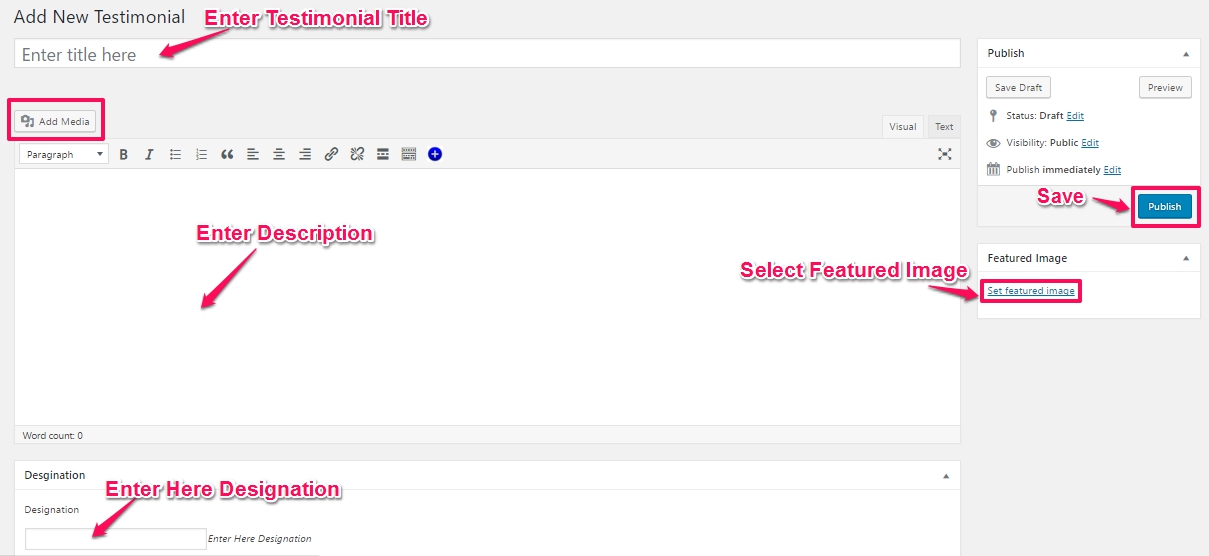
Admin Dashboard → Weblizar Testimonial
Here you can enter your testimonial section tagline like title, description.
Into testimonial detail you can add title, description, designation, featured image etc.
Testimonial Admin View:
Testimonial Front Page View:

Goto Top
(i) Home Blog:
Home blog Section is eight section on home page come after Creative Testimonial section.
Admin Dashboard → Posts
In Home Blog section it shows your latest posts on home.
Blog Admin View:

Blog Front Page View:
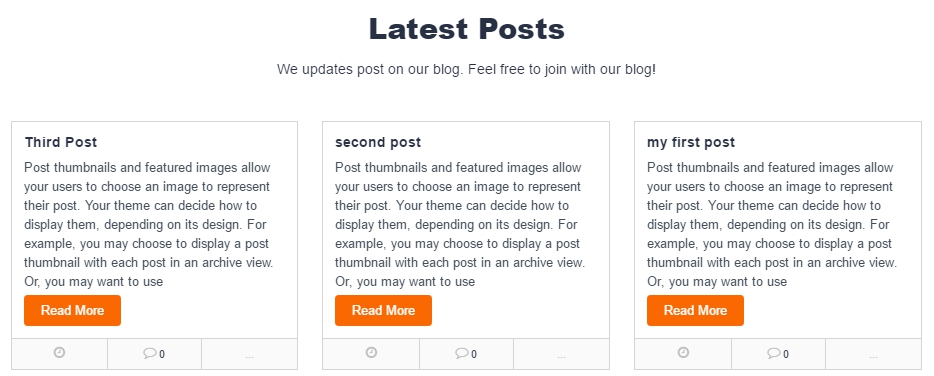
Creative theme provide the SIX type of blog layouts and see the demos of blog layout:
4. Blog Expert
5. Blog masonry
6. Single Blog
(j) Footer Call-Out Area:
Footer Call-Out Section is ninth section on home page come after Creative Blog section.
You can add call-out info to go under Admin Dashboard -→ Appearance -→ Theme Options -→ Footer Callout Options.
Into callout detail you can add description, button text, button link, button target etc.
Footer Call-Out Admin View:

Call Out Front Page View:

(k) Creative Clients:
Creative Client Section is 10th section on home page come after Home Call-out section.
Home Page client section some tag line and description details are fill-up via theme option panel.
Appearance => theme options => client options

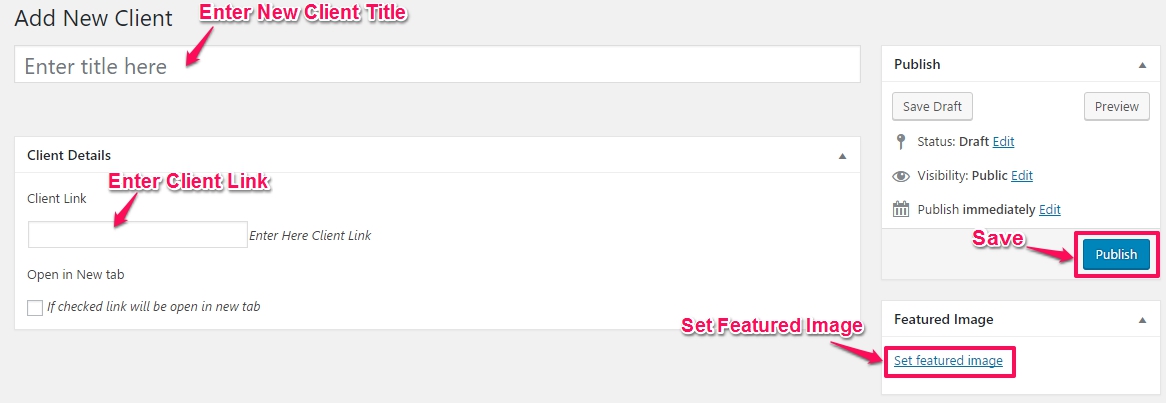
Admin Dashboard →Creative Clients
Here you can enter your client section tagline like title, description.
Into client detail you can add featured image, Featured Image Link, Target etc.
Client Admin View:
Client Front Page View:

Goto Top
(l) Footer Widget Area:
Footer Section is 11th section on home page come after Creative Client section.
You can add widgets to this area.
Appearance → Widgets
Just drag & drop your widgets into “Footer Widget Area”.
Widget Admin View:

Footer Widget View:

(m) Footer Copyright Info:
This section is 12th section in home page and came just after footer widget area.
To add info in this section go to Appearance →Theme Options → Footer Option.
Into copyright section you can add footer customization text, developed by text, developed by link, target etc.
Copyright Admin View:

Copyright Front Page View:
![]()
Goto Top
3. Creative Templates:
Creative Premium theme comes with 15+ template pages. We are explaining below one by one each, how to use or activate different templates?
(a) About Us Page:
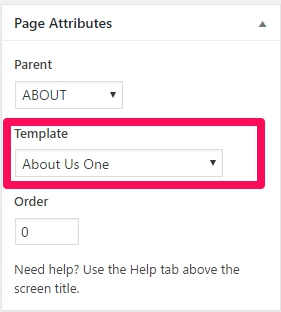
Creative theme has two About US templates,named ‘About us one‘ & ‘About us two’.
About US Page Template can be use as display your Business, Office, Team, Working information. This template contain two section, first one for About Us information. And second one is for Team/Staff information.
Create a About US page for using this template as follows:
Admin Dashboard → Pages → Add New
Now assign this newly created page as About Us One template.
About Us One Template Admin View:
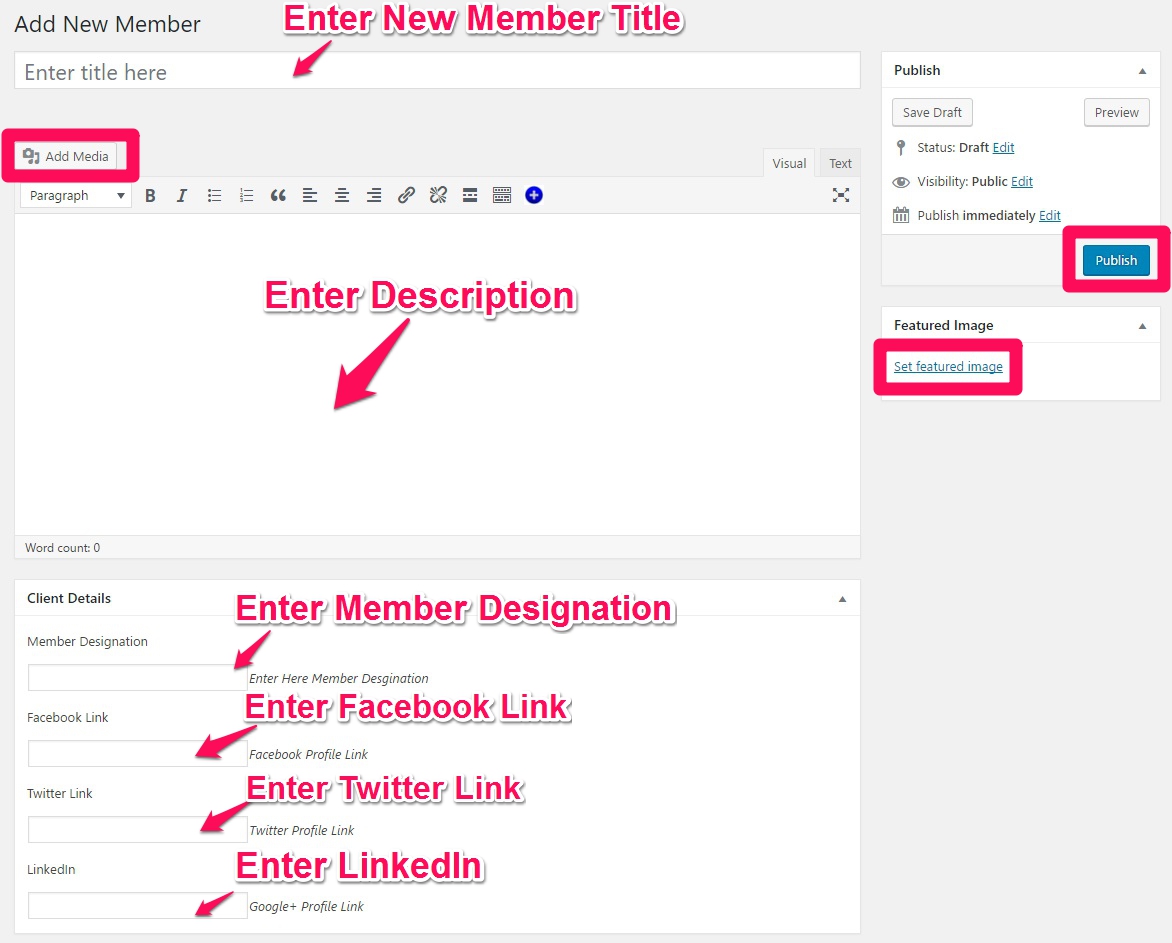
Team / Staff part comes from
Admin Dashboard → Creative Team → Add New Member
Using Add New Member menu link you can add team member for that section.
Team Section Admin View:
About US One Template Front View:

If you will select About Us Two template It will look like following on front page:
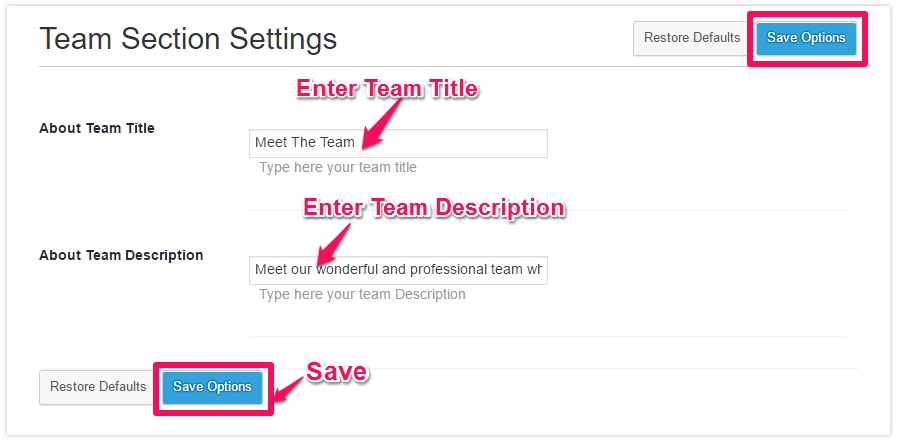
You can change ‘Creative Team Title’ and Description text from Appearance→ Theme Options → Team Option.
Team Tagline Option Panel Settings View:
(b) Contact Us Page:
Creative theme has Three contact page template named ‘Contact Us One‘, ‘Contact Us Two‘ & ‘Contact Us Three‘
Contact Page Template can be used as display your Business, Office contact and location information.
Create a Contact page to use this template as follows:
Admin Dashboard → Pages → Add New
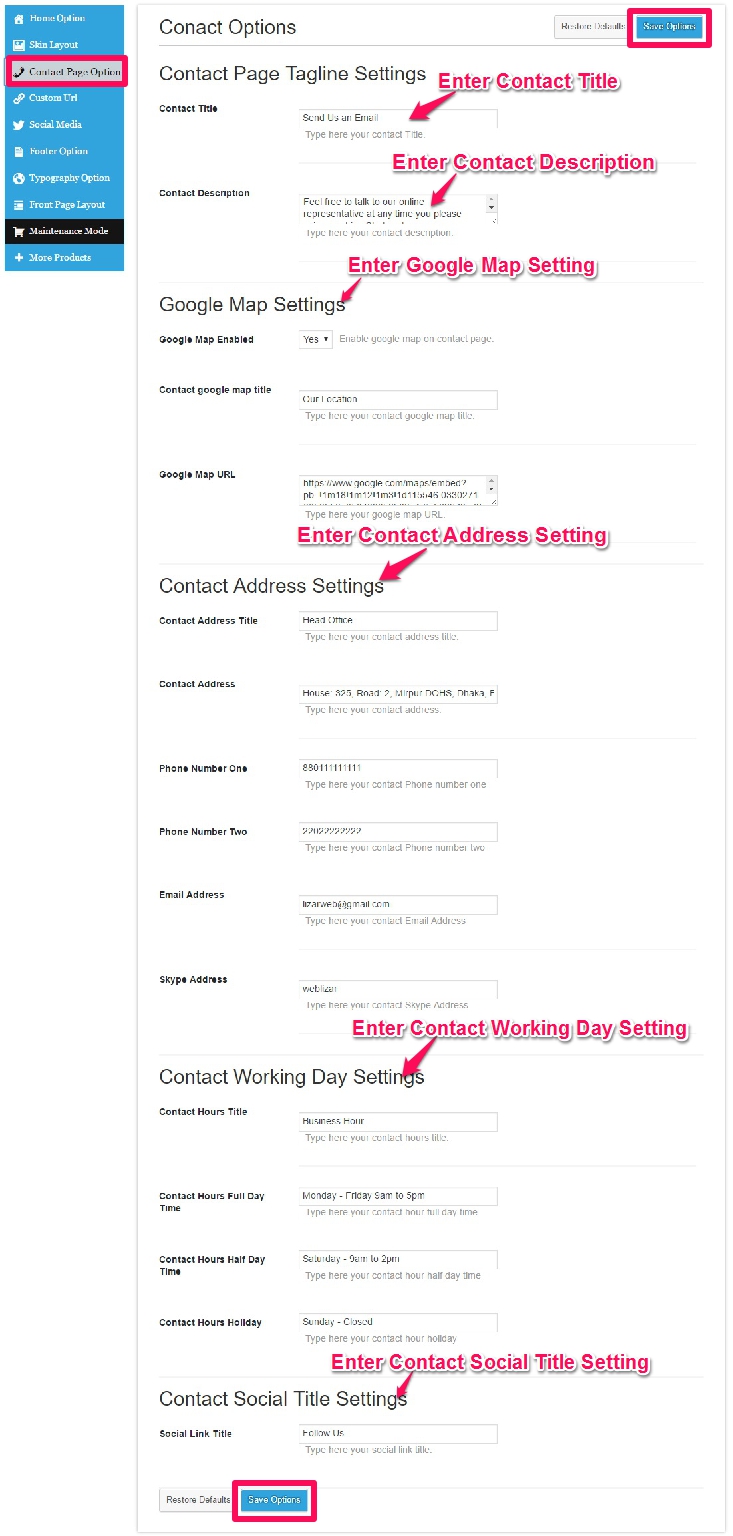
Other Contact & Location information like Google Map, Phone, Email, Office & Marketing Address can be customizable using Theme Options.
Admin Dashboard → Appearance → Theme Options
Contact page Option Panel Admin View:
Front View Of Template list See the live demos of contact template:
(c) Blog Template:
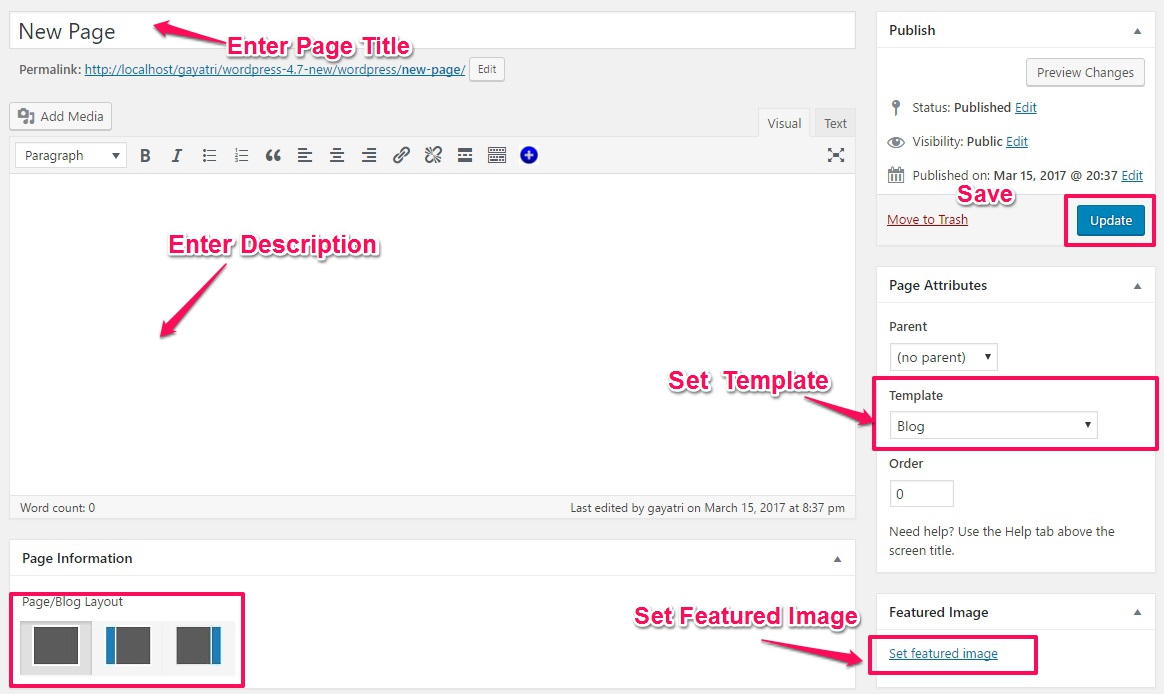
Admin Dashboard → Pages → Add New
Default Blog Template Admin View:
Goto Top
(d) Default Page Template:
Using Page with full width, page with left sidebar & page with right sidebar you can display a specific information in full/left/right sidebar page layout. And that’s seems more attractive for your customers/clients.
To add a default page template go to
Admin Dashboard → Pages → Add New
You can set Page Layout Full/Left/Right sidebar using Page Information Metabox that you found below the editor.
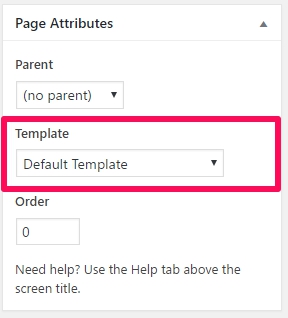
Type/paste your content in editor and select Default Template template from Page Attributes (right side) and publish the page.
Default Page Template Admin View:
Create theme provide the THREE Page template.
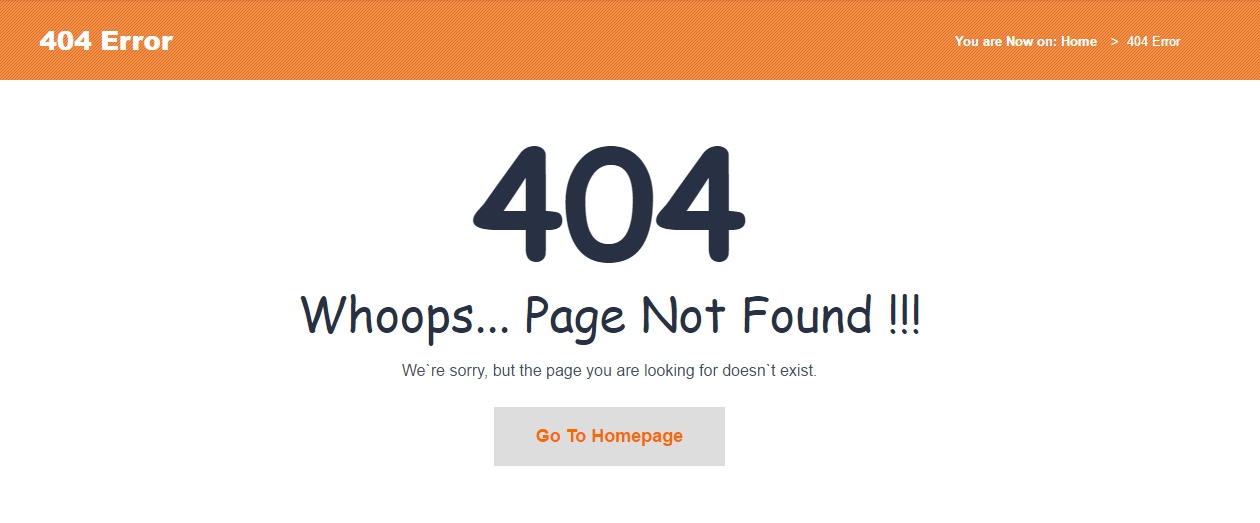
(i) 404 Page:
404 Page template will be display when a visitor on a site request to see unavailable content. The 404 or Not Found error message is a HTTP standard response code indicating that the client was able to communicate with a given server, but the server could not find what was requested.
404 Page Front View:
4. Miscellaneous:
(a) How to change color scheme?
Admin Dashboard → Appearance → Theme Options → Skin layout
In Creative theme there is no limit of color scheme, you can choose any color(s) from color picker for your site.
It also come with 10 predefined color schemes. see screenshot.
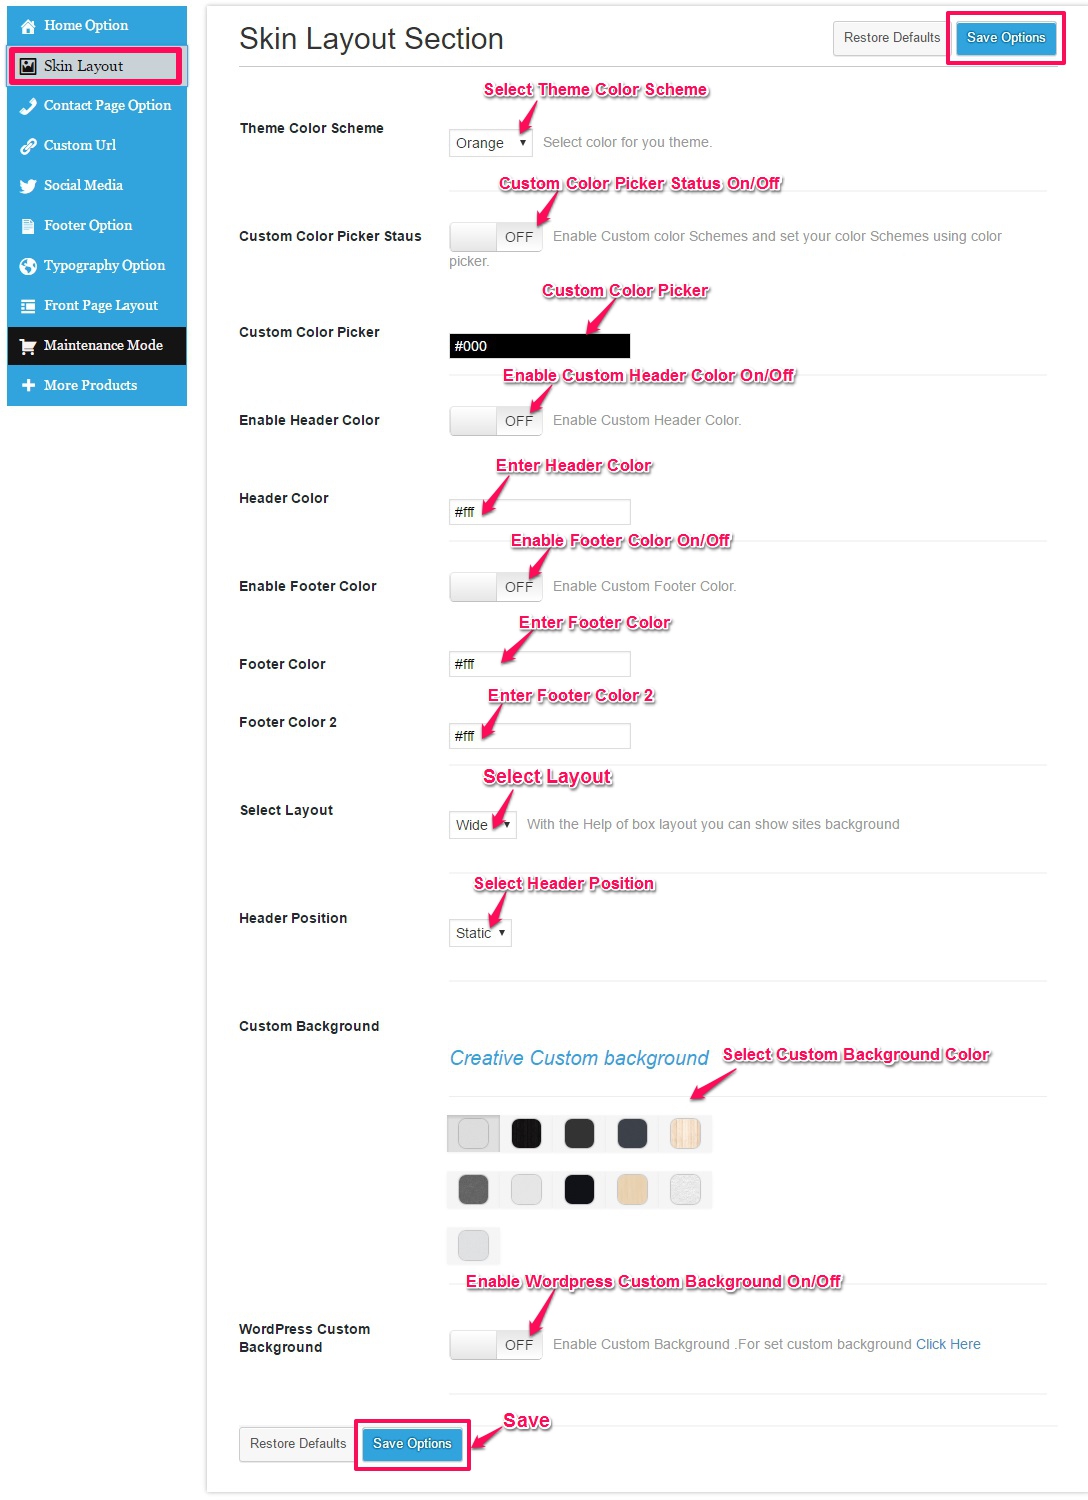
With the help of this section (Skin Layout) you can also select:
(i) Layout of your site (full width or boxed size)
(ii) Header style (Fixed or Static)
(iii) Header Background Color.
(iiii) Footer Background Color.
(iiiii) Custom Background etc.
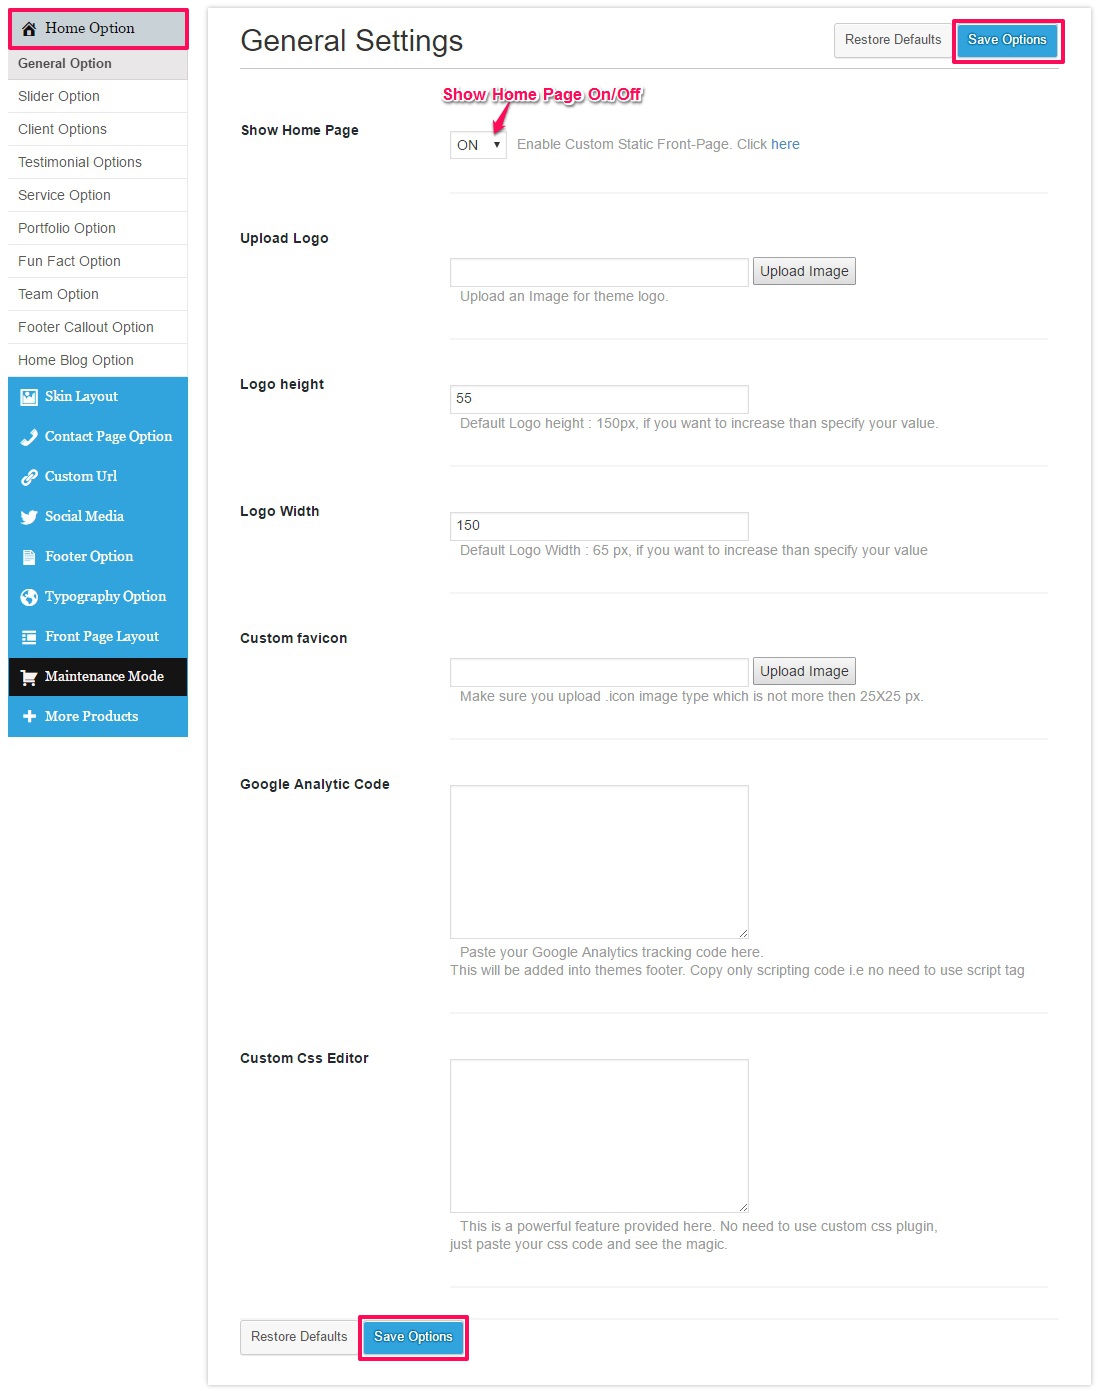
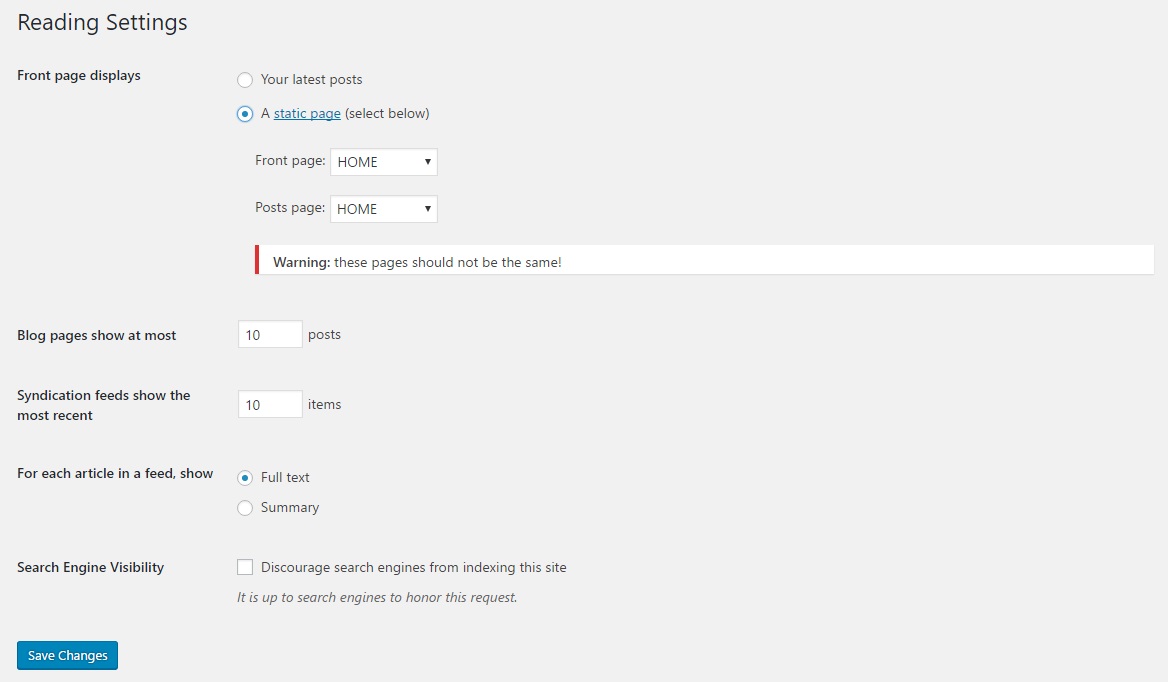
(b) How to set custom front page?
You can show your latest posts on front page or you can select any page as your front page (like About Us page).
Admin Dashboard → Appearance → Theme Options → General Option → Show Home Page
Front Page Option Panel View:
Front Page Admin View:
Goto Top
5. WPML Support:
WPML Theme Documentation – Creative Premium
Creative with WPML: To make your Creative WORDPRESS theme ready with the WPML , Going Multilingual.
Please First Get your WPML Package , Also add the String Translation and Translation Management modules with your Package.
(a) WPML SETUP :
A)
Install and activate the core WPML plugins (WPML Multilingual CMS, WPML String Translation, WPML Translation Management), and then other WPML plugins that may depend on them.
B)
Set up WPML from WPML->Languages. See WPML Getting Started Guide for complete reference, but the initial simple three-step setup is self-explanatory, asking you to choose your default language, a set of active languages, and a language selector.
(b)Translating Pages, Posts and other post types
To translate a page you need to go to Wp admin – Pages and in the list you will see columns for each active language, with a pencil icon (for ‘edit translation’) or a ‘+’ icon (for ‘add translation’) next to each page. Go ahead and edit or add the translated page for ‘Home Default′.
Right now you just need to translate your page into the new language.
Read this to easily duplicate your existing content.
(c)Translating custom post types and taxonomies
Creative comes with extra custom post types such as services , portfolios testimonials , Clients and custom taxonomies. In order to get a similar interface for translation/duplication as for posts and pages, you need to go to WPML->Translation Management, and select the tab ‘Multilingual Content Setup’.
(d)Translating Menus and Language Switcher in Header
WPML can synchronize menus for you. This means that if some entries, for example some pages, posts or categories, are in the English menu, WPML can generate and keep in synch menus for other languages pointing to the translated versions of these pages, posts or categories.
From WordPress Appearance->Menus you can see your existing menus and add menu translations and synchronize menus across translations.
(e)Translating theme texts and other strings in your site
To translate strings you need to follow the procedure for Theme and Plugin Localization. Go to WPML->Theme and Plugin Localization, and click on ‘Scan the theme for strings’ and you will see theme strings and which ones are translated or not.
Goto Top

